MEMORY TILE
Putting memory to stone
Throughout time and across cultures, people have recorded memories and stories through art.
Emma Simms, Oh Happy Days, 2020
Overview
Phones have made photography so accessible to everyone, people can take a picture of something they find beautiful, silly, or wanted to remember. But the act of taking a photo of that specific thing and moment is a conscious choice that allows the viewer to relive their memories. The Memory Tile project asks students to recreate a photograph from their camera roll using new techniques that they will use throughout their ceramics art-making. They will learn how to wedge their own clay, use the slab roller, and use additive and subtractive properties to create an image within their tiles.
Lesson Summary / Rationale:
The Ceramics 1 class is a first introduction to using clay, for many students it is a completely foreign medium. Each technique and project builds on top of each other, allowing the students to create new and exciting pieces in combination with each other. In learning how to wedge, students will be able to have as much clay they may need at their disposal and allow them to independently work on multiple projects at once. The use of a slab roller and making slabs will be essential for students to create tiles and built forms simply. As for incorporating their phones and the student’s own images, the hope is to engage the students with the project, letting them recreate memories and images that are important to them. These tiles will record the student’s memories, and allow them to be recorded for the rest of time.
Artworks, Artists, and/or Artifacts:
Kira Straub is a multi-media artist, her works focus on a variety of topics but speaks at length of her relationship with clay.
“Instead I imagined how the artist built each piece, and I thought about the number of hands that had touched each pot in the history of its existence. One of the first things you learn in ceramics is that clay has a memory. If you build the perfect bowl and accidentally bend the rim, even if you bend it back, when the clay is fired it will remember that dent and bend back out of shape. When I look at works that are as old as the ones in the ceramic museum, I wonder if clay has more than a physical memory. I wonder if a pot remembers the history of the people that use it inside of its walls. I wonder if the work I build in clay will remember the history of my hands molding it, shaping it. I hope that if it does, it will forgive me for resenting it for as long as I did.” -Kira Straub
The piece above is part of a series in which she explores the different finishes one can achieve in different areas of the kiln. Noting that it is “much in the same way we humans are a reflection of the marks others make on us, each work emerges from the kiln bearing the distinct marks of the environment surrounding it.”
These two quotes reflect the reflections needed in making a piece based off a memory. Each student has a unique photo, no two will have the same exact lighting, composition, color. The memories gathered at that particular moment are marks upon the student that make them who they are.
Ignaz Gunther sculpted God the Father between 1770-80, but relief sculpture has been used for a millennia all over the world.
Reliefs were used to adorn architectural spaces, columns, doorways, temples, but were also to preserve history and stories. These sculptures were easier to depict complex movement, multitudes of figures, and active poses rather than sculpture in the round. The threat of gravity and balance is lessened, and artists are able to create intricate narratives that the viewer can decipher.
Key Concepts:
In this modern age, most people have easy access to a camera and its images. These photographs are art in itself, and are records of the owner’s memories.
Many students find their inspirations or ideas from online, and do not do much to alter them or make their own. Each student has lived a unique life with unique memories and stories.
Relief sculptures have been a way to record these stories throughout history. In the test of time, stone and clay are preserved better for future viewers to see.
Essential Questions:
Why do artists record their memories or stories?
How can newer artists find inspiration from their own experiences and the world around them?
Why record memories visually in stone rather than writing on paper?
Standards
National Standards:
VA:Cr2.2IIIa - Organize and develop artistic ideas and work
Enduring Understanding: Artists and designers balance experimentation and safety, freedom and responsibility while developing and creating artworks.
Essential Questions: How do artists and designers care for and maintain materials, tools, and equipment? Why is it important for safety and health to understand and follow correct procedures in handling materials, tools, and equipment? What responsibilities come with the freedom to create?
Demonstrate understanding of the importance of balancing freedom and responsibility in the use of images, materials, tools, and equipment in the creation and circulation of creative work.
The students will be working with a variety of tools to sculpt, carve, and roll their tiles. It is vital that they understand the responsibility of maintaining and using the tools safely in order to create their works. Many of the tools can be considered dangerous if used improperly.
VA:Cn10.1.Ia - Synthesize and relate knowledge and personal experience to make art
Enduring Understanding: Through art-making, people make meaning by investigating and developing awareness of perceptions, knowledge, and experiences.
Essential Questions: How does engaging in creating art enrich people’s lives? How does making art attune people to their surroundings? How do people contribute to awareness and understanding of their lives and the lives of their communities through art-making?
Document the process of developing ideas from early stages to fully elaborated ideas.
The students will be developing awareness about their experiences. It is important for them to understand where they come from, what experiences led them to the present moment in time. Through this process, the students will document it all through submissions on Google Classroom. These submissions will collect the photos the students may use, their sketches, progress checks, and their final piece.
Objectives:
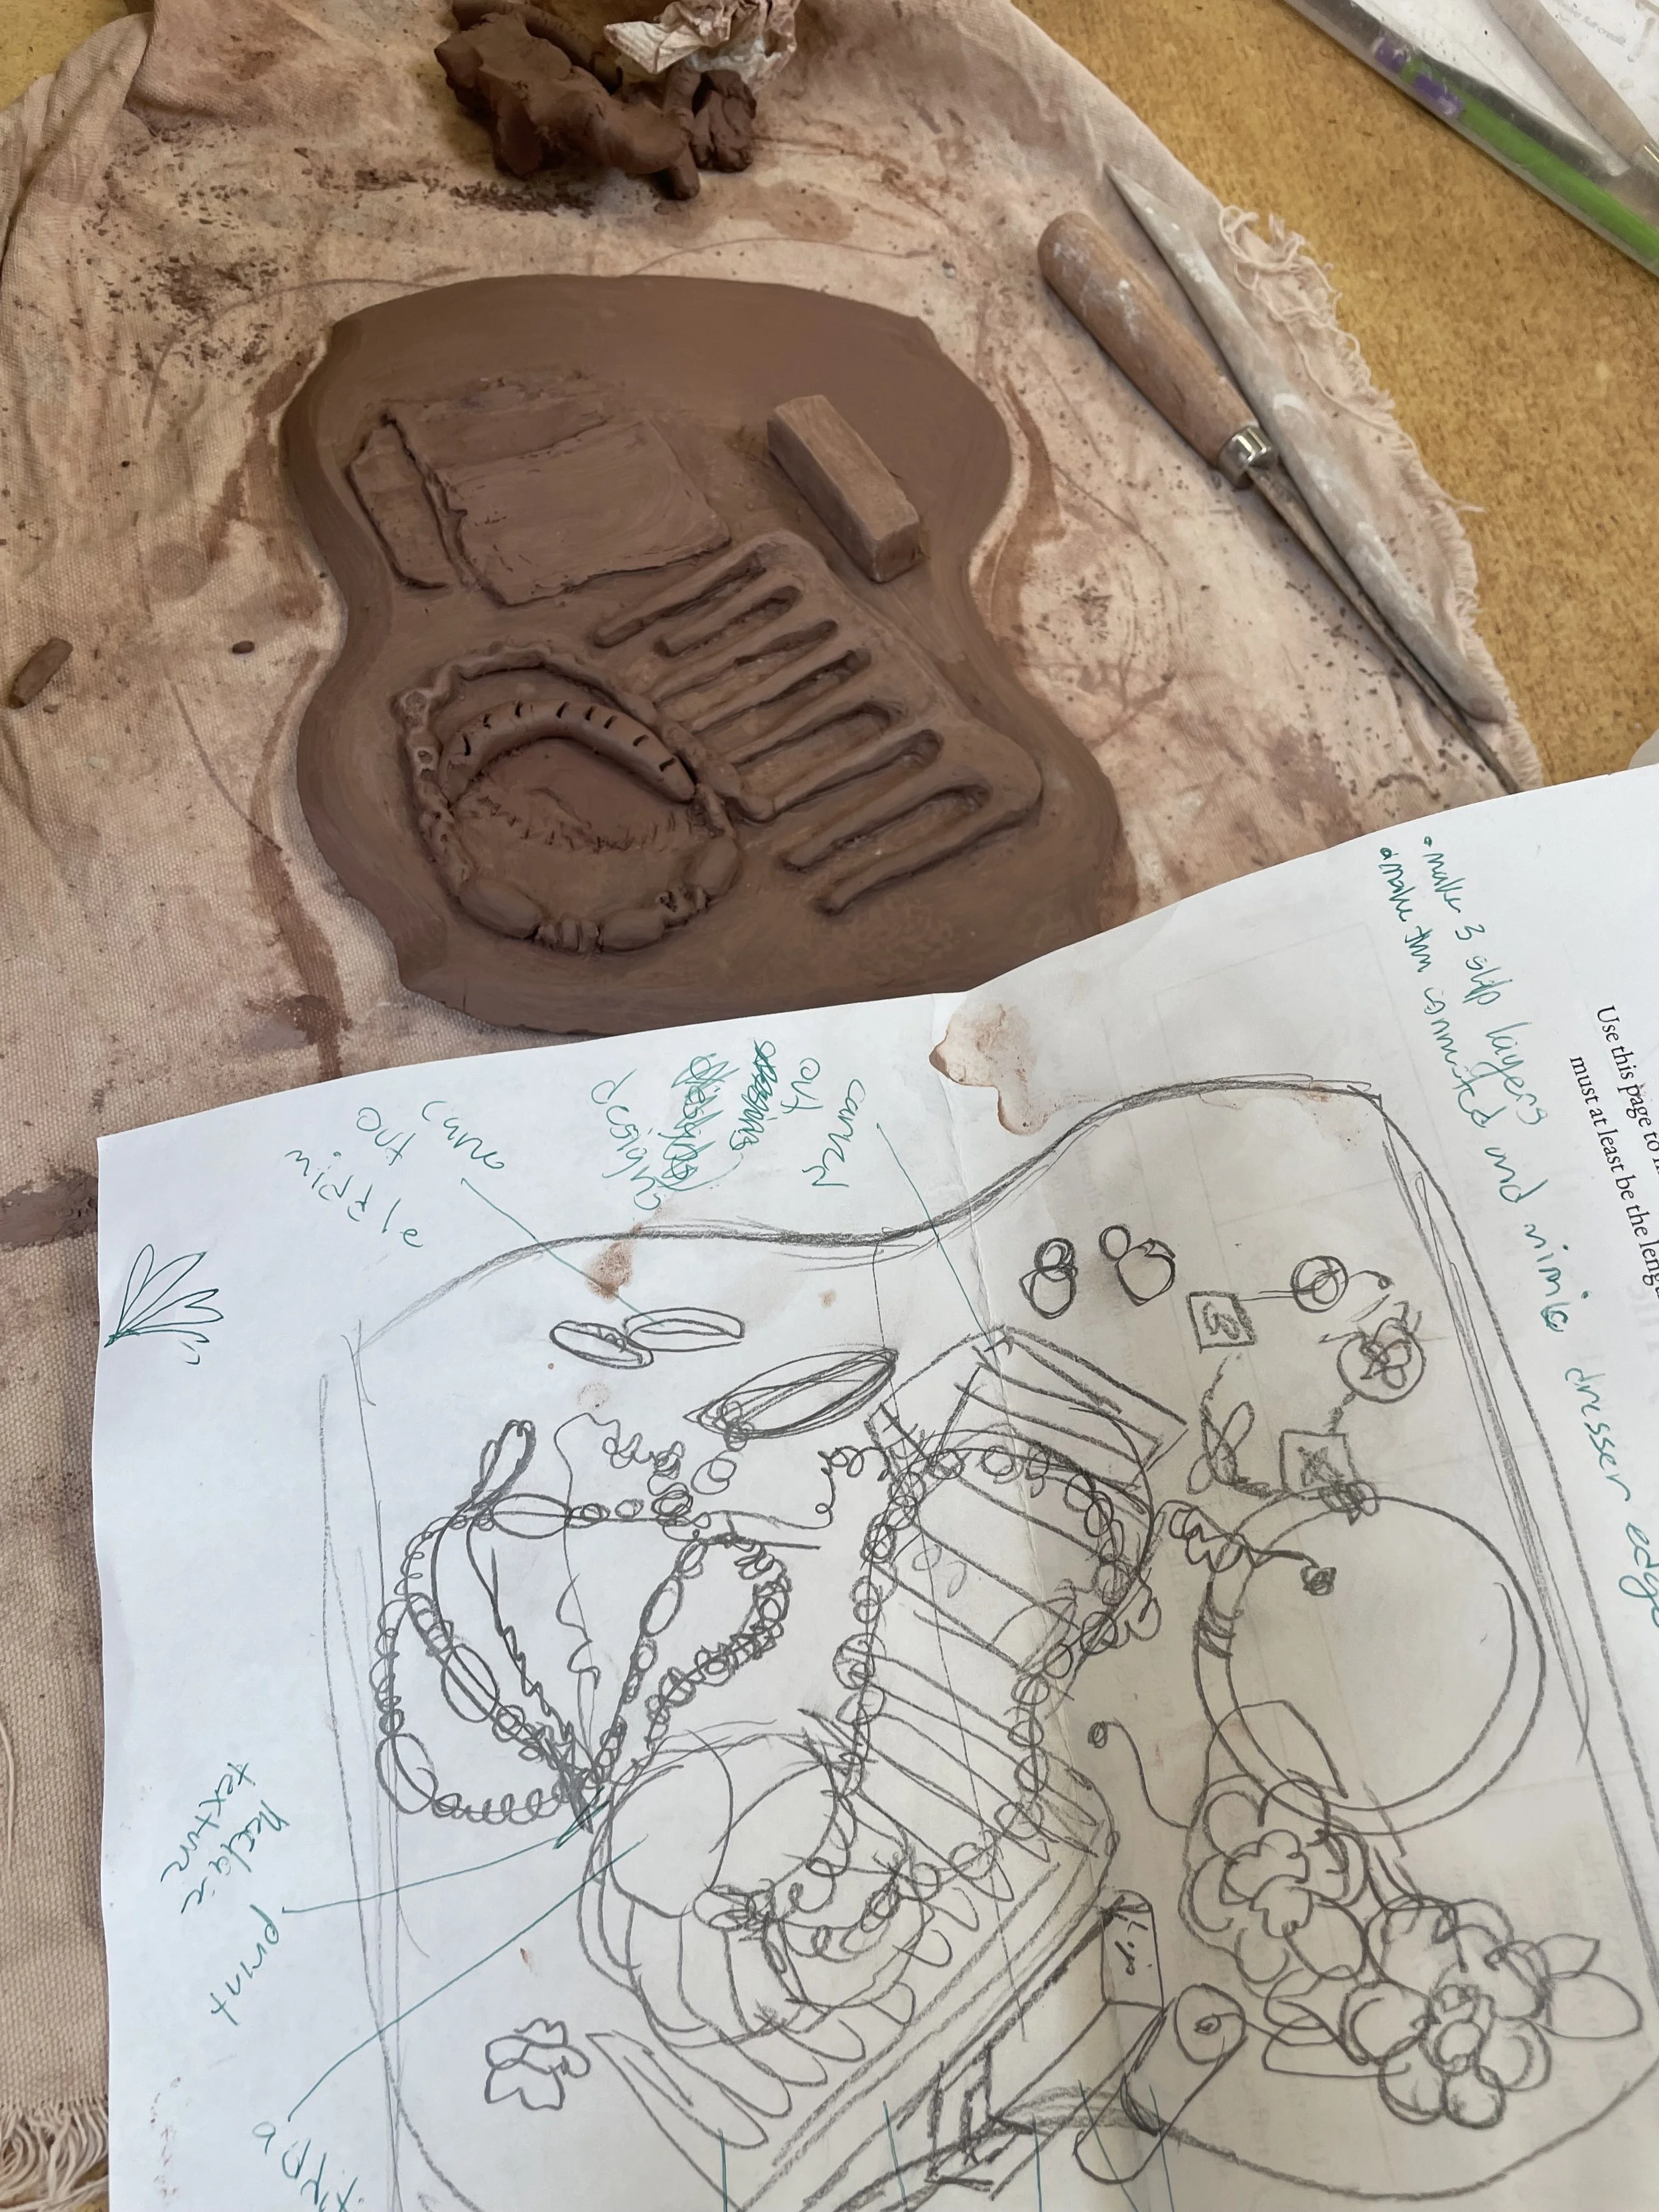
Students will create either a low or high relief tile using both additive and subtractive elements of clay.
Students will learn to use the slab roller, an essential piece of equipment used in ceramics, and create the base of the tile using it.
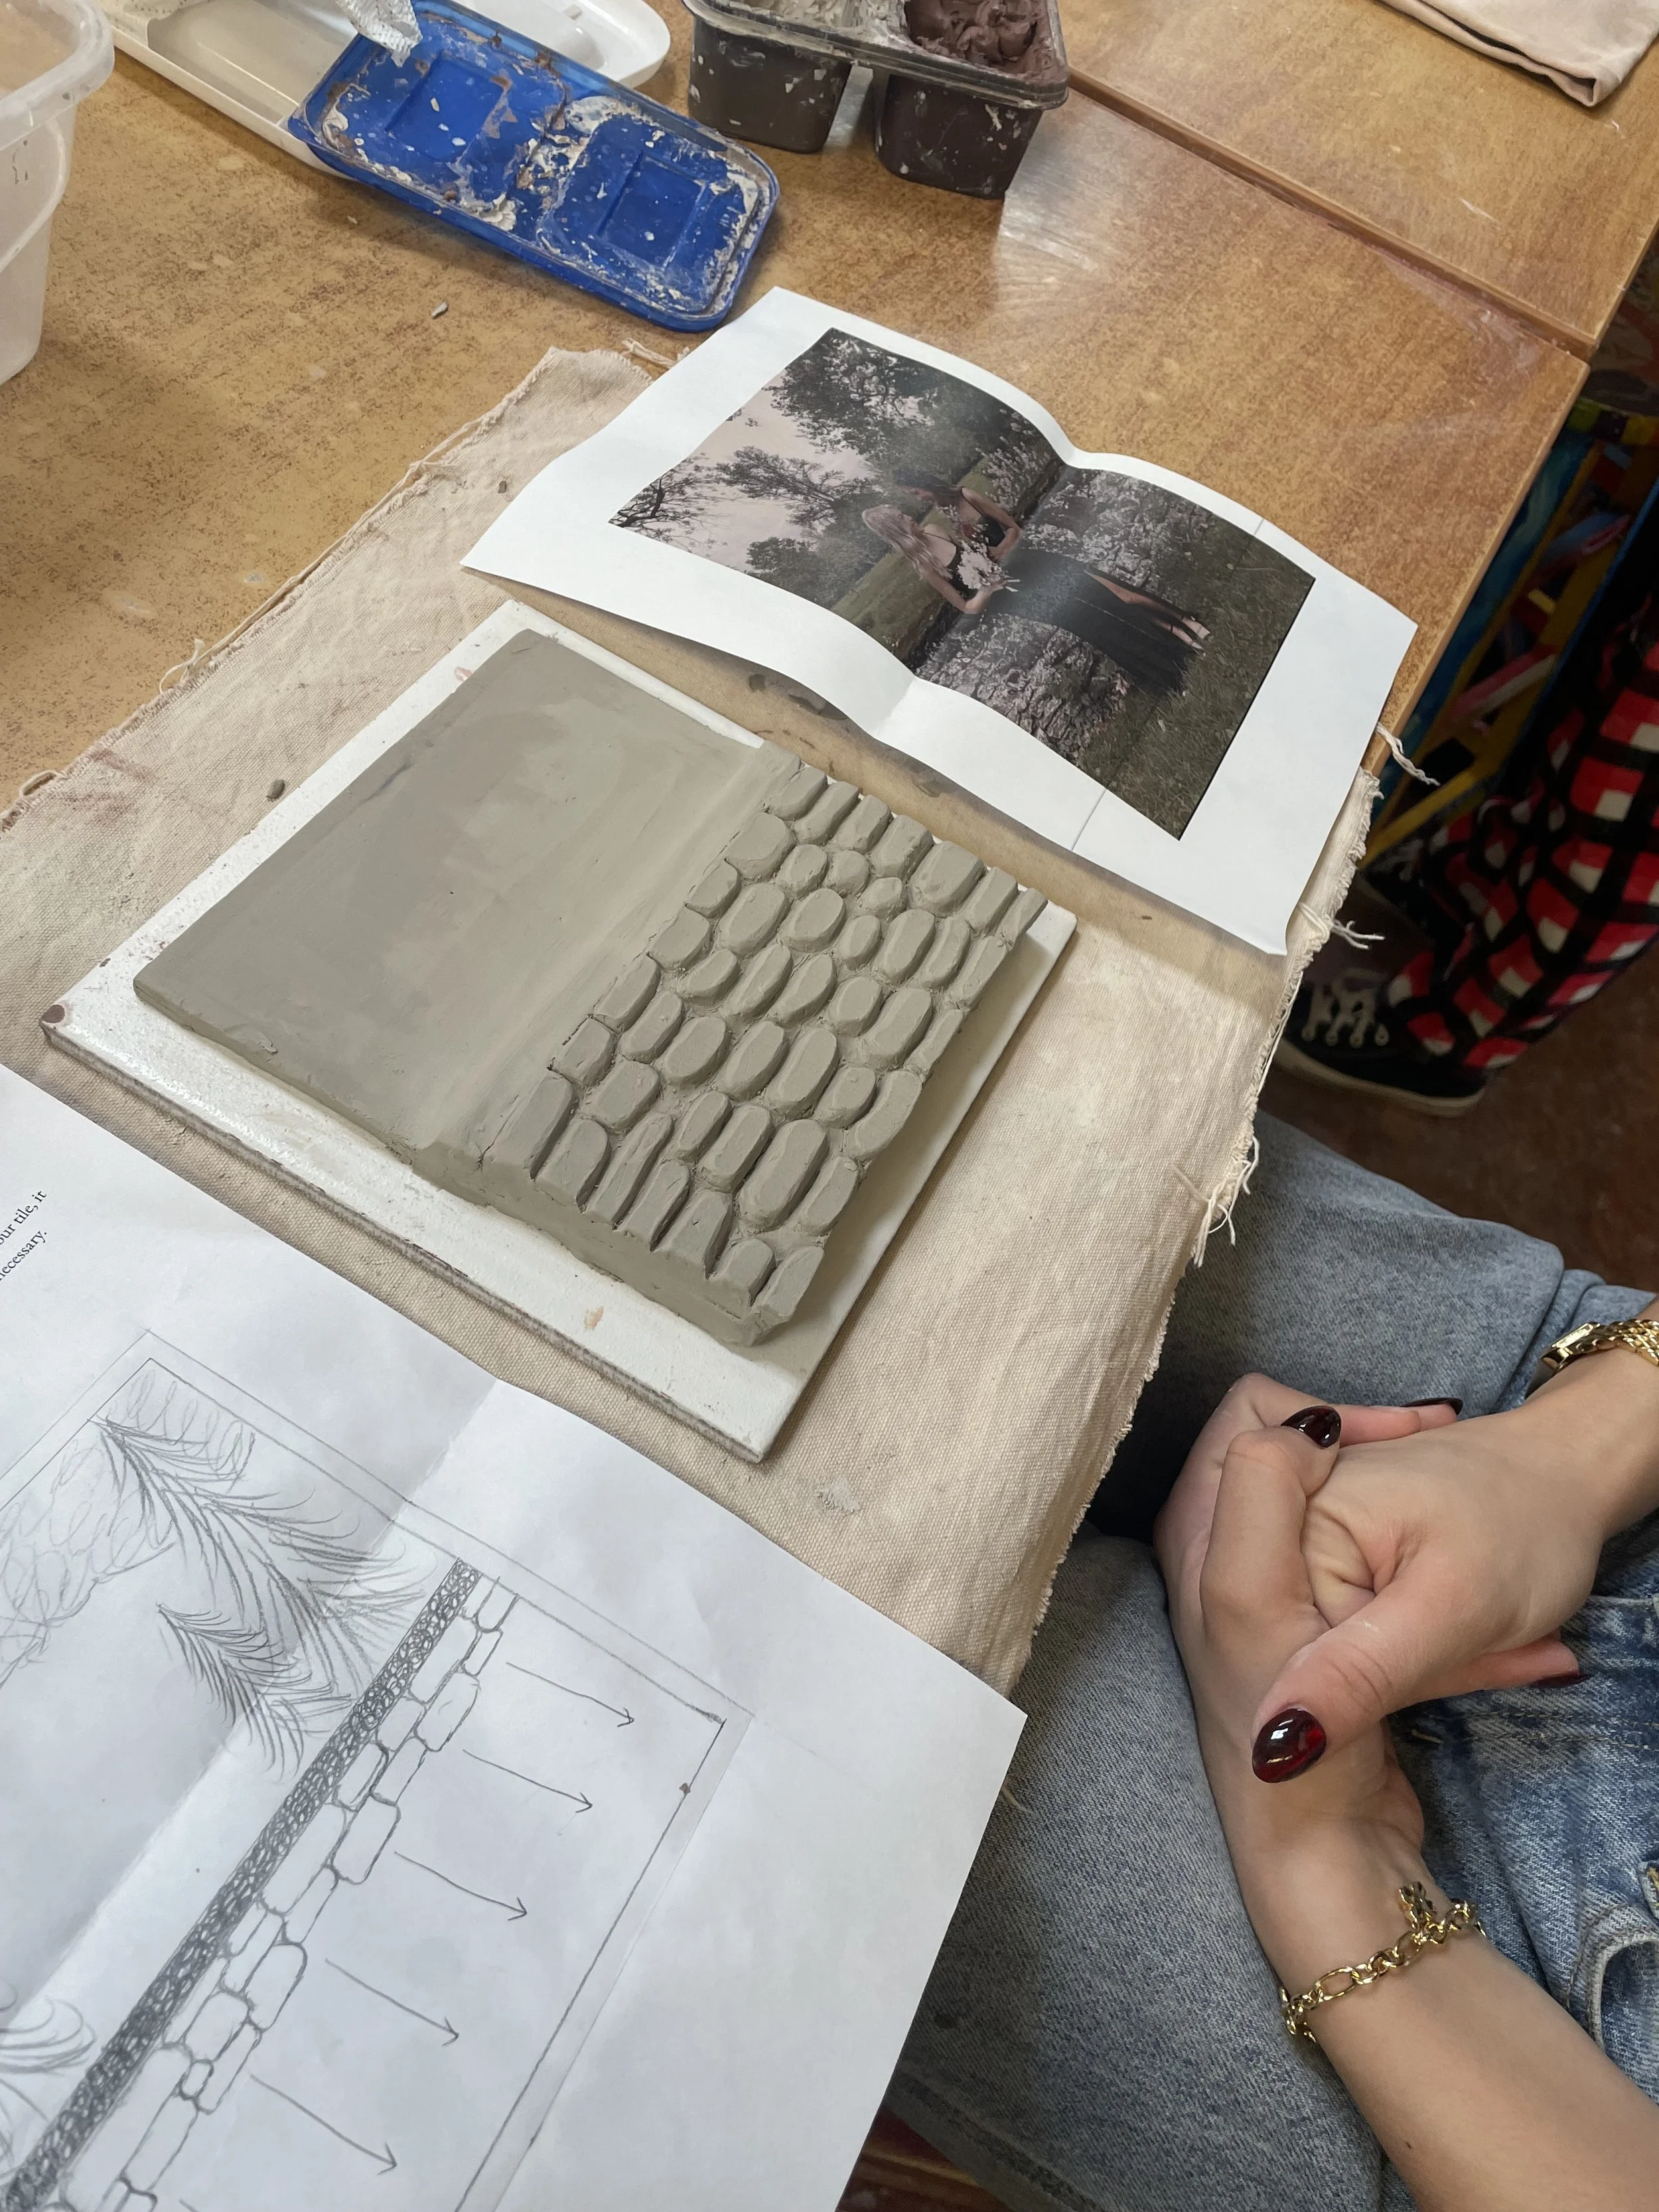
Students will choose an original photograph as their inspiration, and explain why the subject matter chosen is a meaningful memory to them.
Students will create a tile with the craftsmanship of artists, their tile will be structurally sound, no excess clay particles, no broken pieces, etc.
Assessment:
Students will be asked to go through their camera rolls and reflect why they chose to take photos. They will analyze the when, where, what, and why to the photo, narrowing down which one they will use for their tile.
Students will expand upon their ideas and think about ways they can alter the contents of the photograph to suit their memories and tiles best.
Students will be observed throughout the processes to note if they can wedge clay and use the slab roller on their own. The finished tile will be proof of both.
Students will finish the project by completing a self evaluation. This will influence their final grades. The instructor will use the same rubric for grading projects.
Memory Tile Self Reflection.pdf
Instructional Procedures
Day 1
Motivation or Engagement:
Phones have made photography so accessible to everyone, people can take a picture of something they find beautiful, silly, or wanted to remember. But the act of taking a photo of that specific thing and moment is a conscious choice that allows the viewer to relive their memories.
Students will be asked to take their phones out to look through their camera rolls. They will be asked how many images do they have on their phone (or wherever their saved pictures go to.)
Is it mostly pictures of you? Your friends, family, pets? Do you take a lot of pictures of the foods you eat? Places you go? Things you do?
Whoever has the most and least in the class will get a small prize.
Why do you take pictures?
Development:
The students will be introduced to the Memory Tile project, an introduction to an art form that has existed for nearly as long as humanity has made art. They will be shown sculptural relief artworks from antiquity, and a few examples that are used in their day-to-day lives. The overview of the project is that the students will set their memories, a photograph, to stone, using additive and subtractive qualities in the clay.
Culmination or Closer:
Once the project has been introduced, students will have the rest of the class period to finish a previous project, begin to find photos, and work on sketches for their tile.
Day 2
Motivation or Engagement:
A general question will be asked to the class. Who needs more clay? The majority of students will have used all their clay for a previous project, and today will be focused on making sure students have the necessary materials for the tile project.
Development:
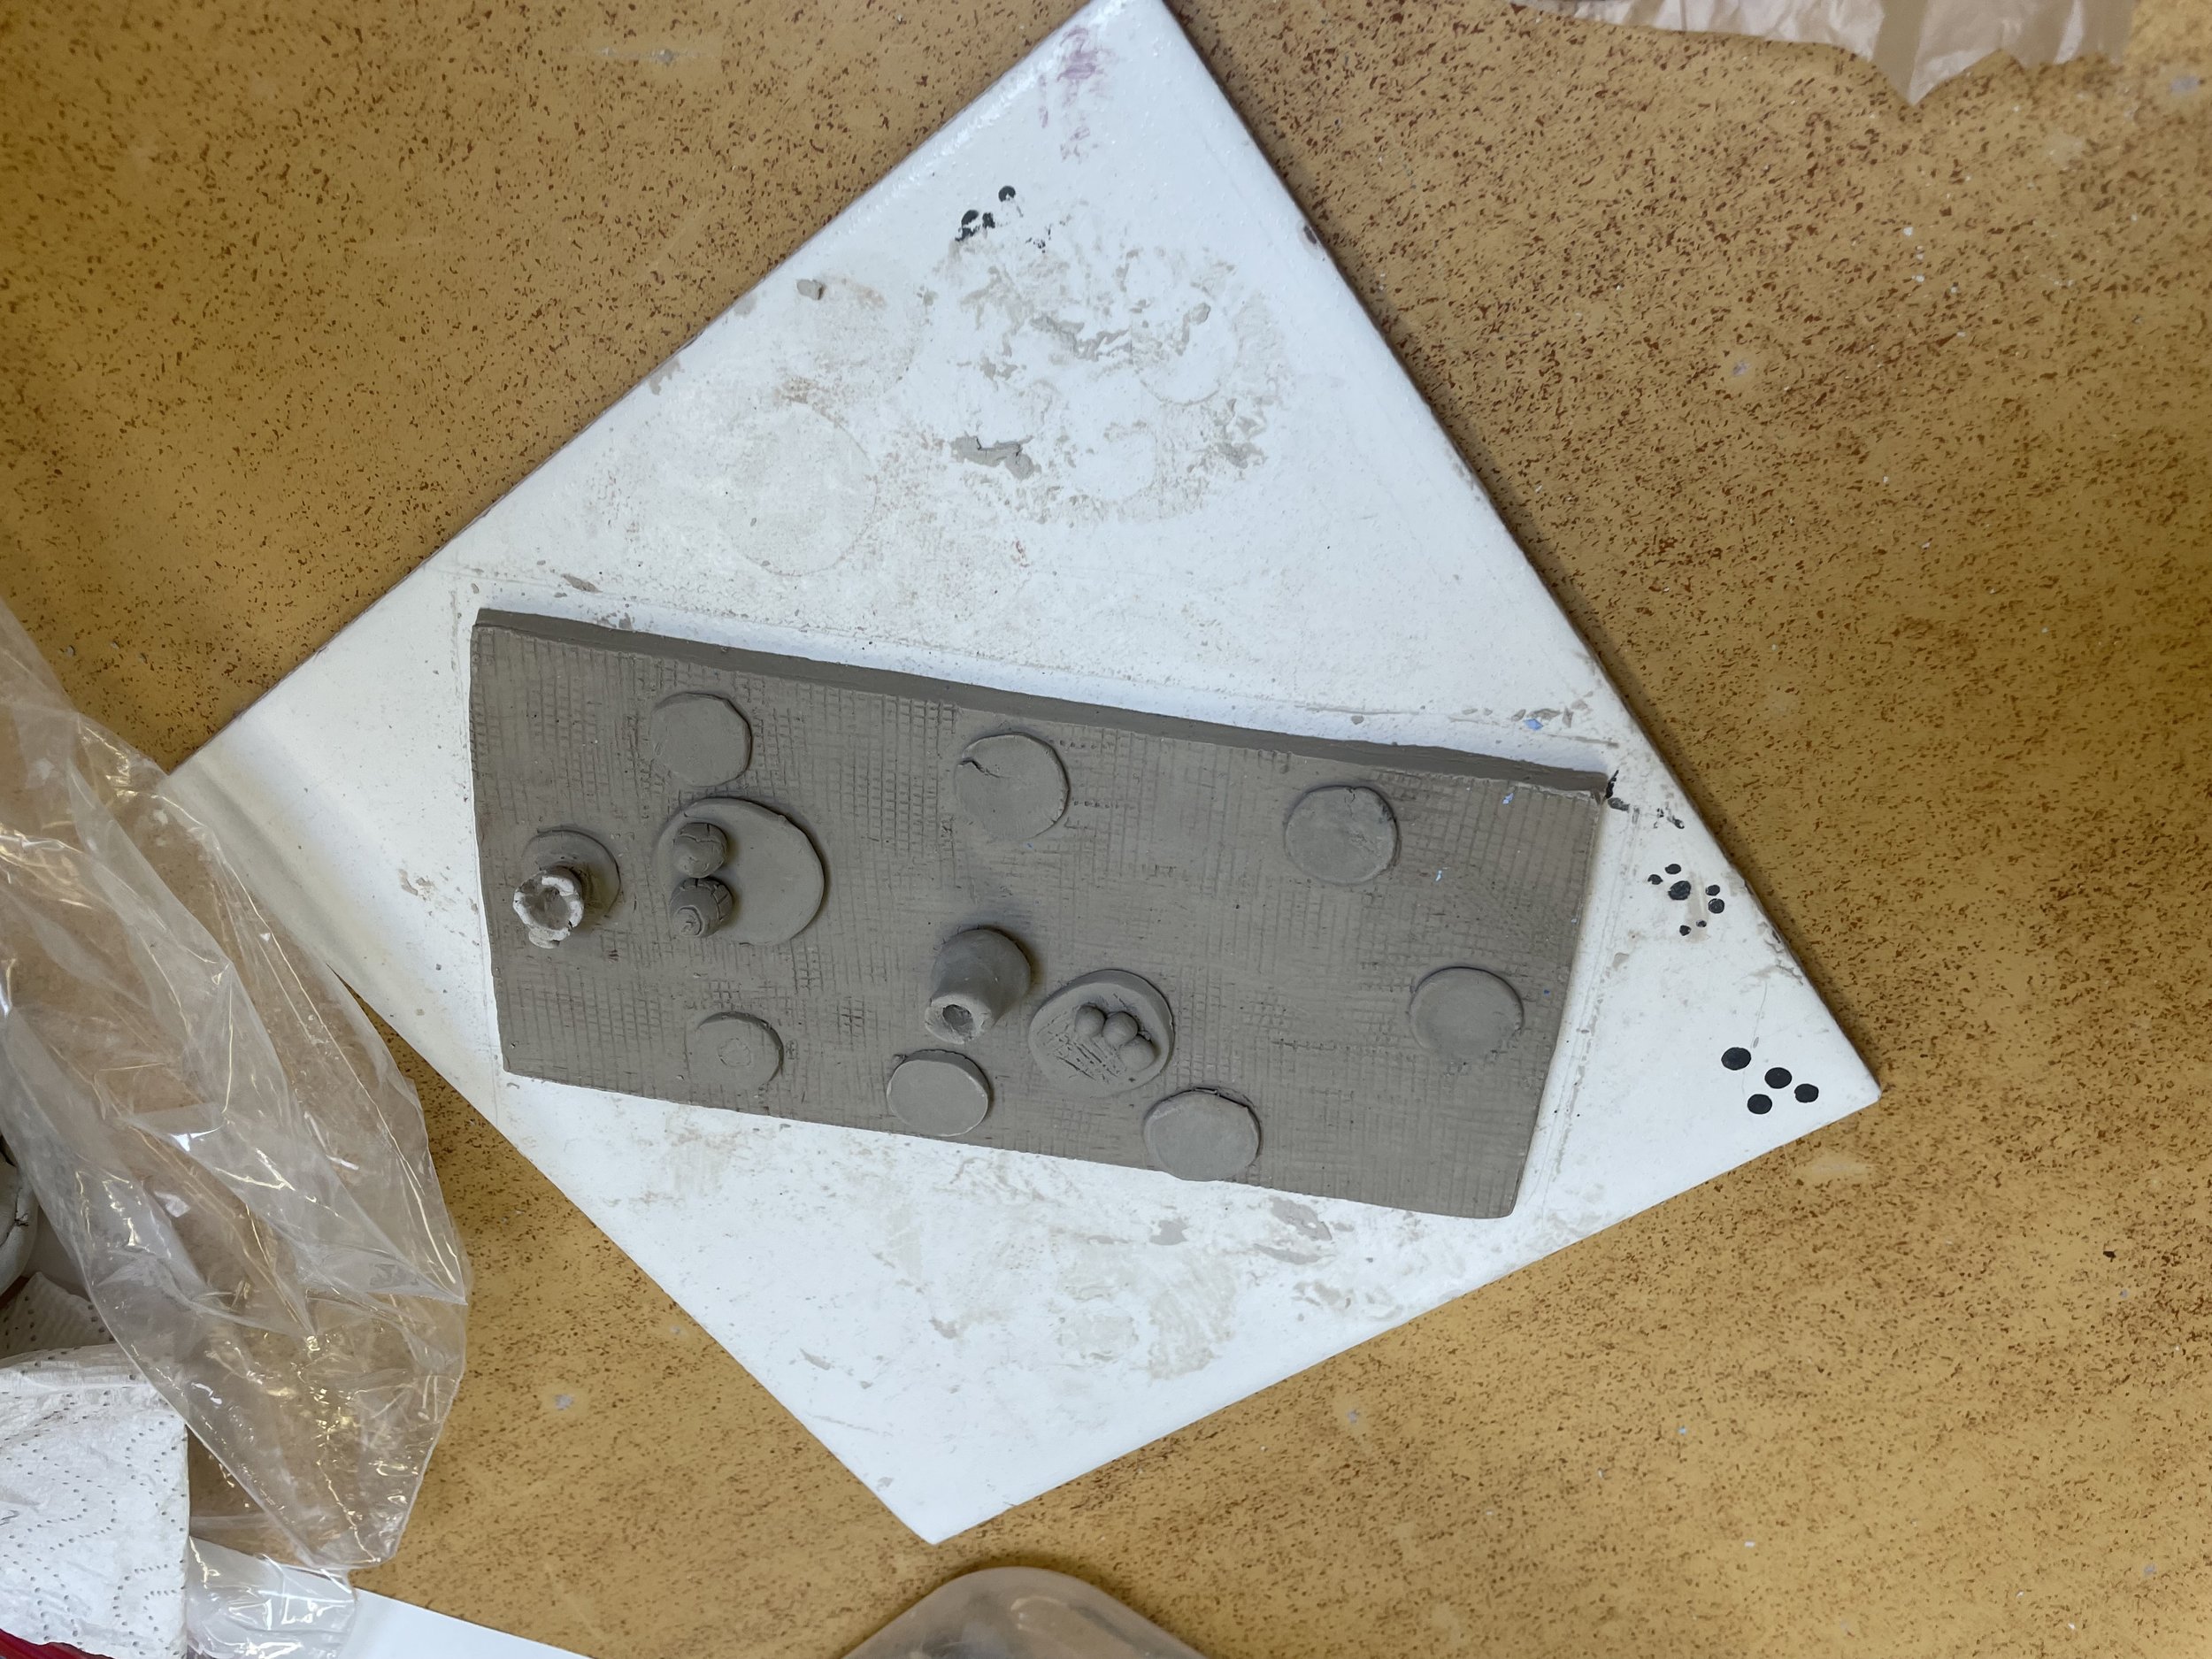
Once the students have their sketch sheets, half the class will be called back to the wedging tables. There they will learn how to wedge their own clay, a process that is instrumental to the recycling circle of clay. Different surfaces will be laid out so the students can feel how the moisture can be drawn out by each one from the clay. The students will take a handful of clay from the slop buckets, spreading it thinly on the surface, and wait for the surfaces to draw out moisture. In the meantime, the instructor will describe the lifecycle of clay.
The instructor will make sure students understand that this is a messy process. If they don’t wish to get their clothes dirty, they should roll their sleeves up and put on an apron.
Clay is recyclable up until it is put into the kiln, but it is possible to use it over and over again. The slop buckets are where scraps, dry pieces, and water go to make an unmixed slip - a term that they should all be familiar with by now. As they take it out of the slop buckets, the students will notice how wet it is, once they place it onto the surfaces the water will begin to be drawn out, hardening the clay into a workable state.
The instructor will ask the students about what they’ve noticed about the different stages of clay.
Could anyone tell me what it’s like working with really wet clay?
Working with clay that is wet means that smoothing and attaching pieces are seamless, but it has too much give (floppiness) to it. Wet clay is not structurally sound.
They may have noticed this when working on a previous project, maybe their pinch pots slumped over while trying to build them.
When we let it set up to a point where it’s still wet, but has more structural integrity is known as the leather hard state. At that point it’s also the best time to add surface designs.
Could anyone tell me what it’s like working with drying and bone dry clay?
They may have noticed that if they tried rolling a coil that it cracks and crumbles easily. Or if they tried to smooth or attach anything while their clay was very dry.
That is a state called bone dry, if they try to attach anything onto a bone dry piece, it will fall off due to different drying times.
It is easier to let a wet piece dry bit by bit, than it is to bring moisture back to a really dry piece. It is in best practices for them to leave a damp (not soaking) paper towel in with their piece, especially over weekends.
Once the clay has set up a little, the instructor will demonstrate how to wedge. Wedging is important because it gets the clay into an even consistency, removes air bubbles, and readies the clay for use in making.
As the instructor finishes the demo, and students finish wedging, the next half of the class will be called back and the instructor will repeat the demo.
Culmination or Closer:
The students will continue finishing their previous project and working on submitting their photos and sketch sheets to Google Classroom.
Day 3
Development:
The students will be shown how to use the slab roller to create an even thickness for their tiles. They will first be shown how to throw their clay at an angle to flatten it out before it goes into the slab roller. The instructor will go over how to properly use the slab roller, and emphasize the importance of compressing the slabs after rolling. In reference to the big idea, the instructor will go over how clay has memory as well. If it is bent as a slab, more often than not it will warp back into that bend during firing. Compressing the slab smooths out the clay’s memory, coaxing it to stay in its form.
Culmination or Closer:
After the demonstration, the students will have the rest of the class period to roll out their own slabs and finish their photo and sketch sheet which will be due by the end of the day.
Day 4
Motivation or Engagement:
The students will begin by receiving a print out of their photograph so that they may reference it through the building processes. The instructor will encourage students to share their photos and stories with their table.
Development:
The students will spend the day working on their tiles. The instructor will walk around and check in with each student, answering any questions and guiding them through potential challenges of their slabs.
Day 5
Development:
The students will spend the day working on their tiles. The instructor will walk around and check in with each student, answering any questions and guiding them through potential challenges of their slabs.
Day 6
Development:
This will be the last in class work day, the students will have a pre-bisque critique where they can see the work of everyone else in the class. They will each be given a set of four different color sticky notes, one for an additive property, subtractive property, narrative, and a question. The tiles will not have any color except the raw clay body, so the students will not be critiquing on a color. The students do not have to use all their sticky notes, but they must place at least two of them on another student’s work. If there is a big placement of sticky notes on one piece, the entire class will have a discussion based on what it is and why they may like it. If not, the students will move back to their tables and talk about things they saw and if they received any new inspiration for their own piece.
The rest of the period will be a work day where the instructor will check in with each student.
Culmination or Closer:
As this is the last in class work day, the students will be asked to reflect on the building process and project as a whole. There will be a discussion post on classroom that the students must respond to within a week.
As the project finishes, what have been your thoughts on the building process and project as a whole. “What did you think about working with the slab roller, creating from your own pictures, or a class critique? You can say you did or did not like it, but I want you to tell me WHY.”
Day 7/8
Development:
As the pieces come out of the bisque, students will retrieve their tiles and begin glazing. The instructor will continue to check in with each student to ensure that their questions are answered.
Once the pieces have been glaze fired, the tiles will be set out all together for a final gallery walk. The students will be able to look at the entire class’s finished tiles, and a short discussion similar to the pre-bisque critique will take place. After, the students will complete a self assessment and evaluation for their final grades.
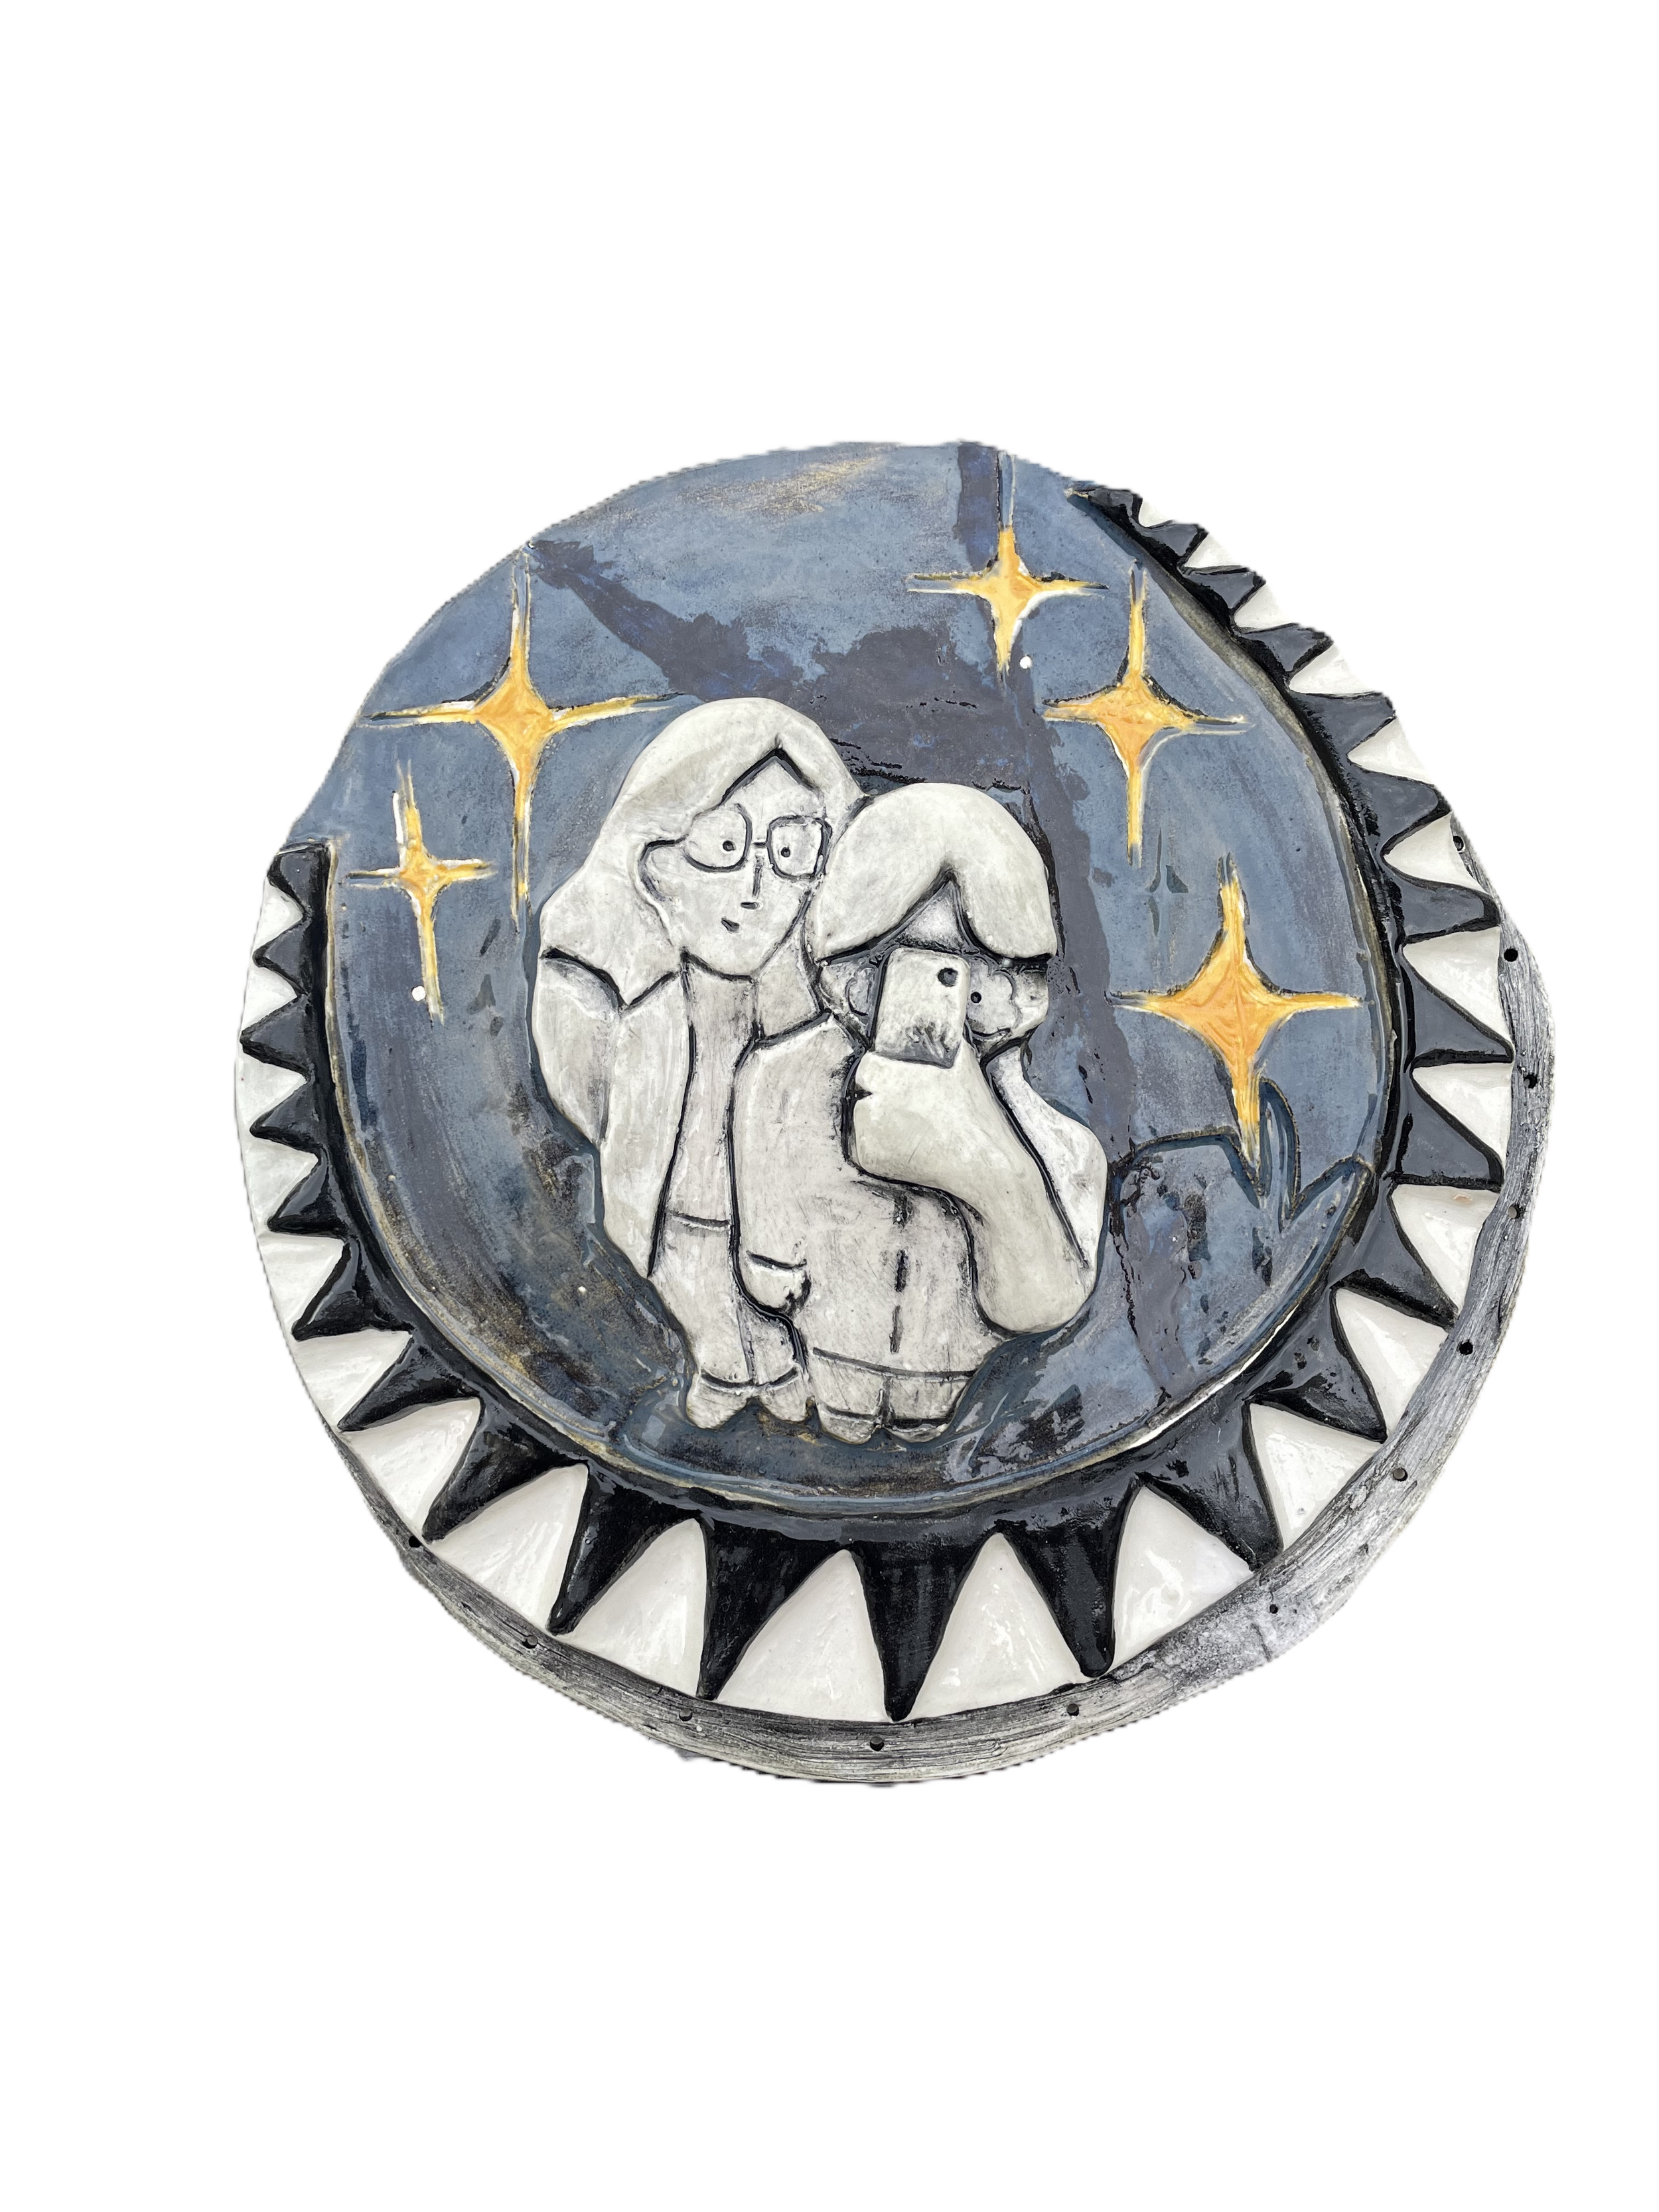
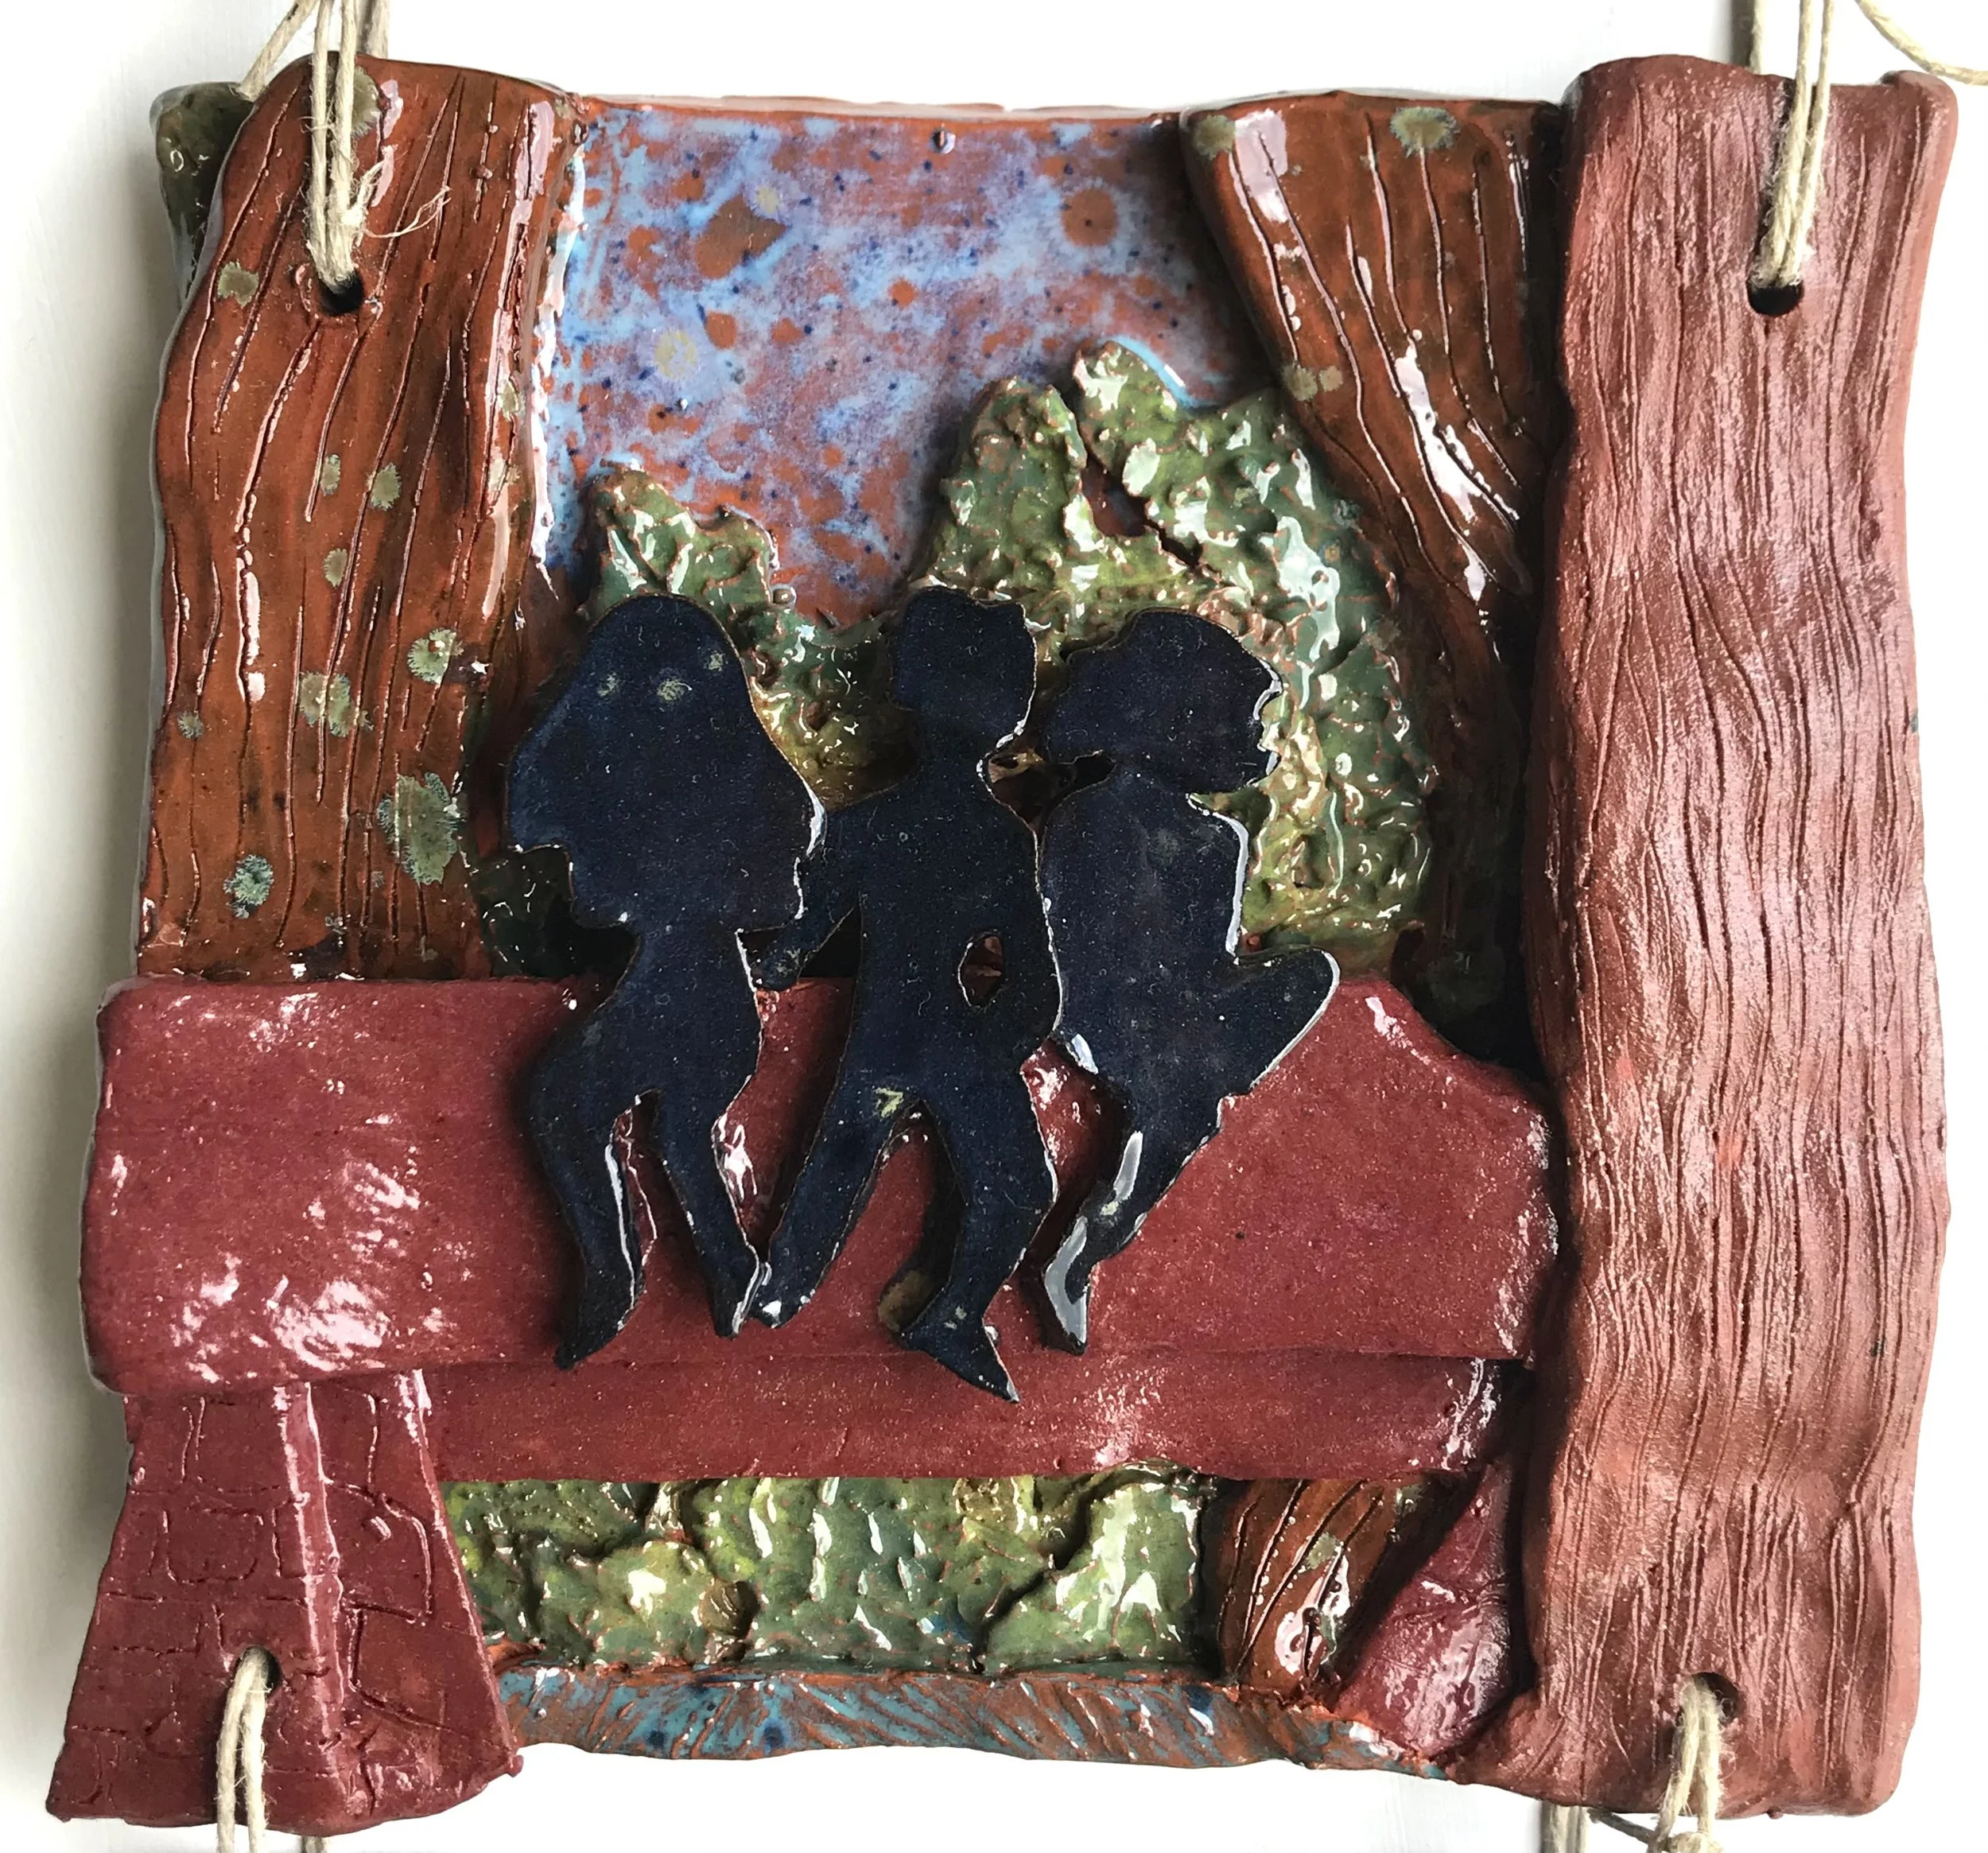
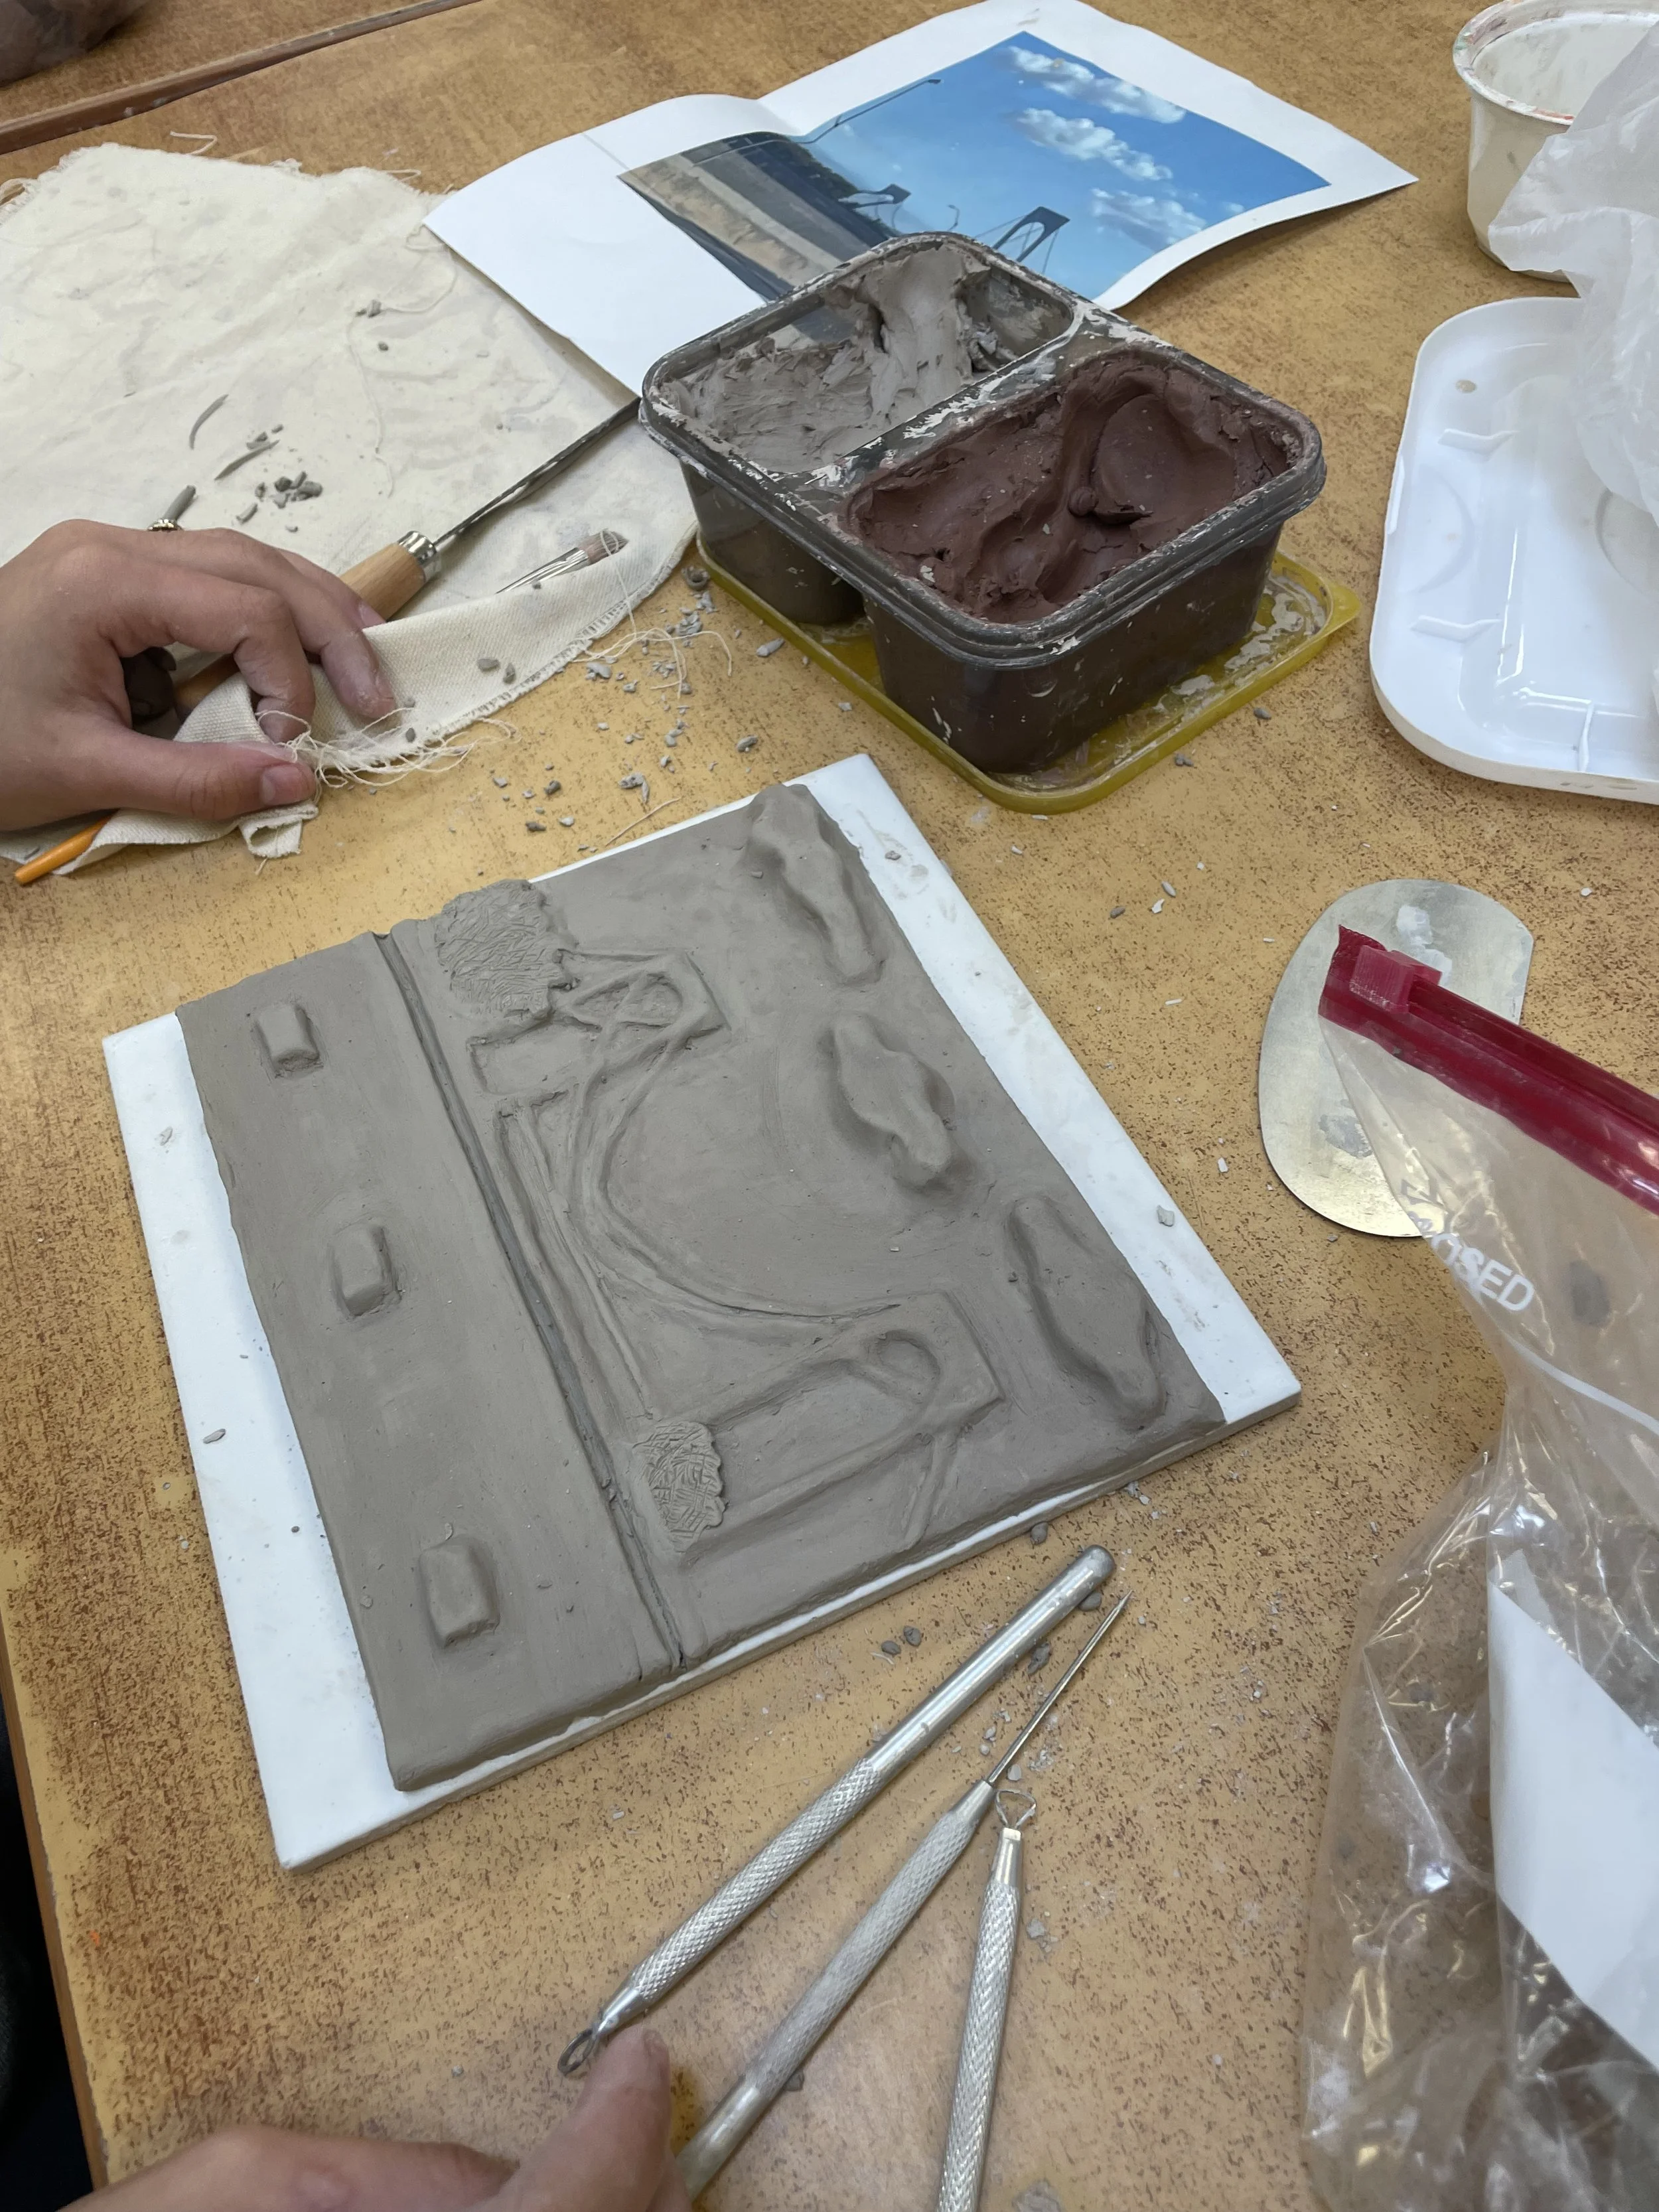
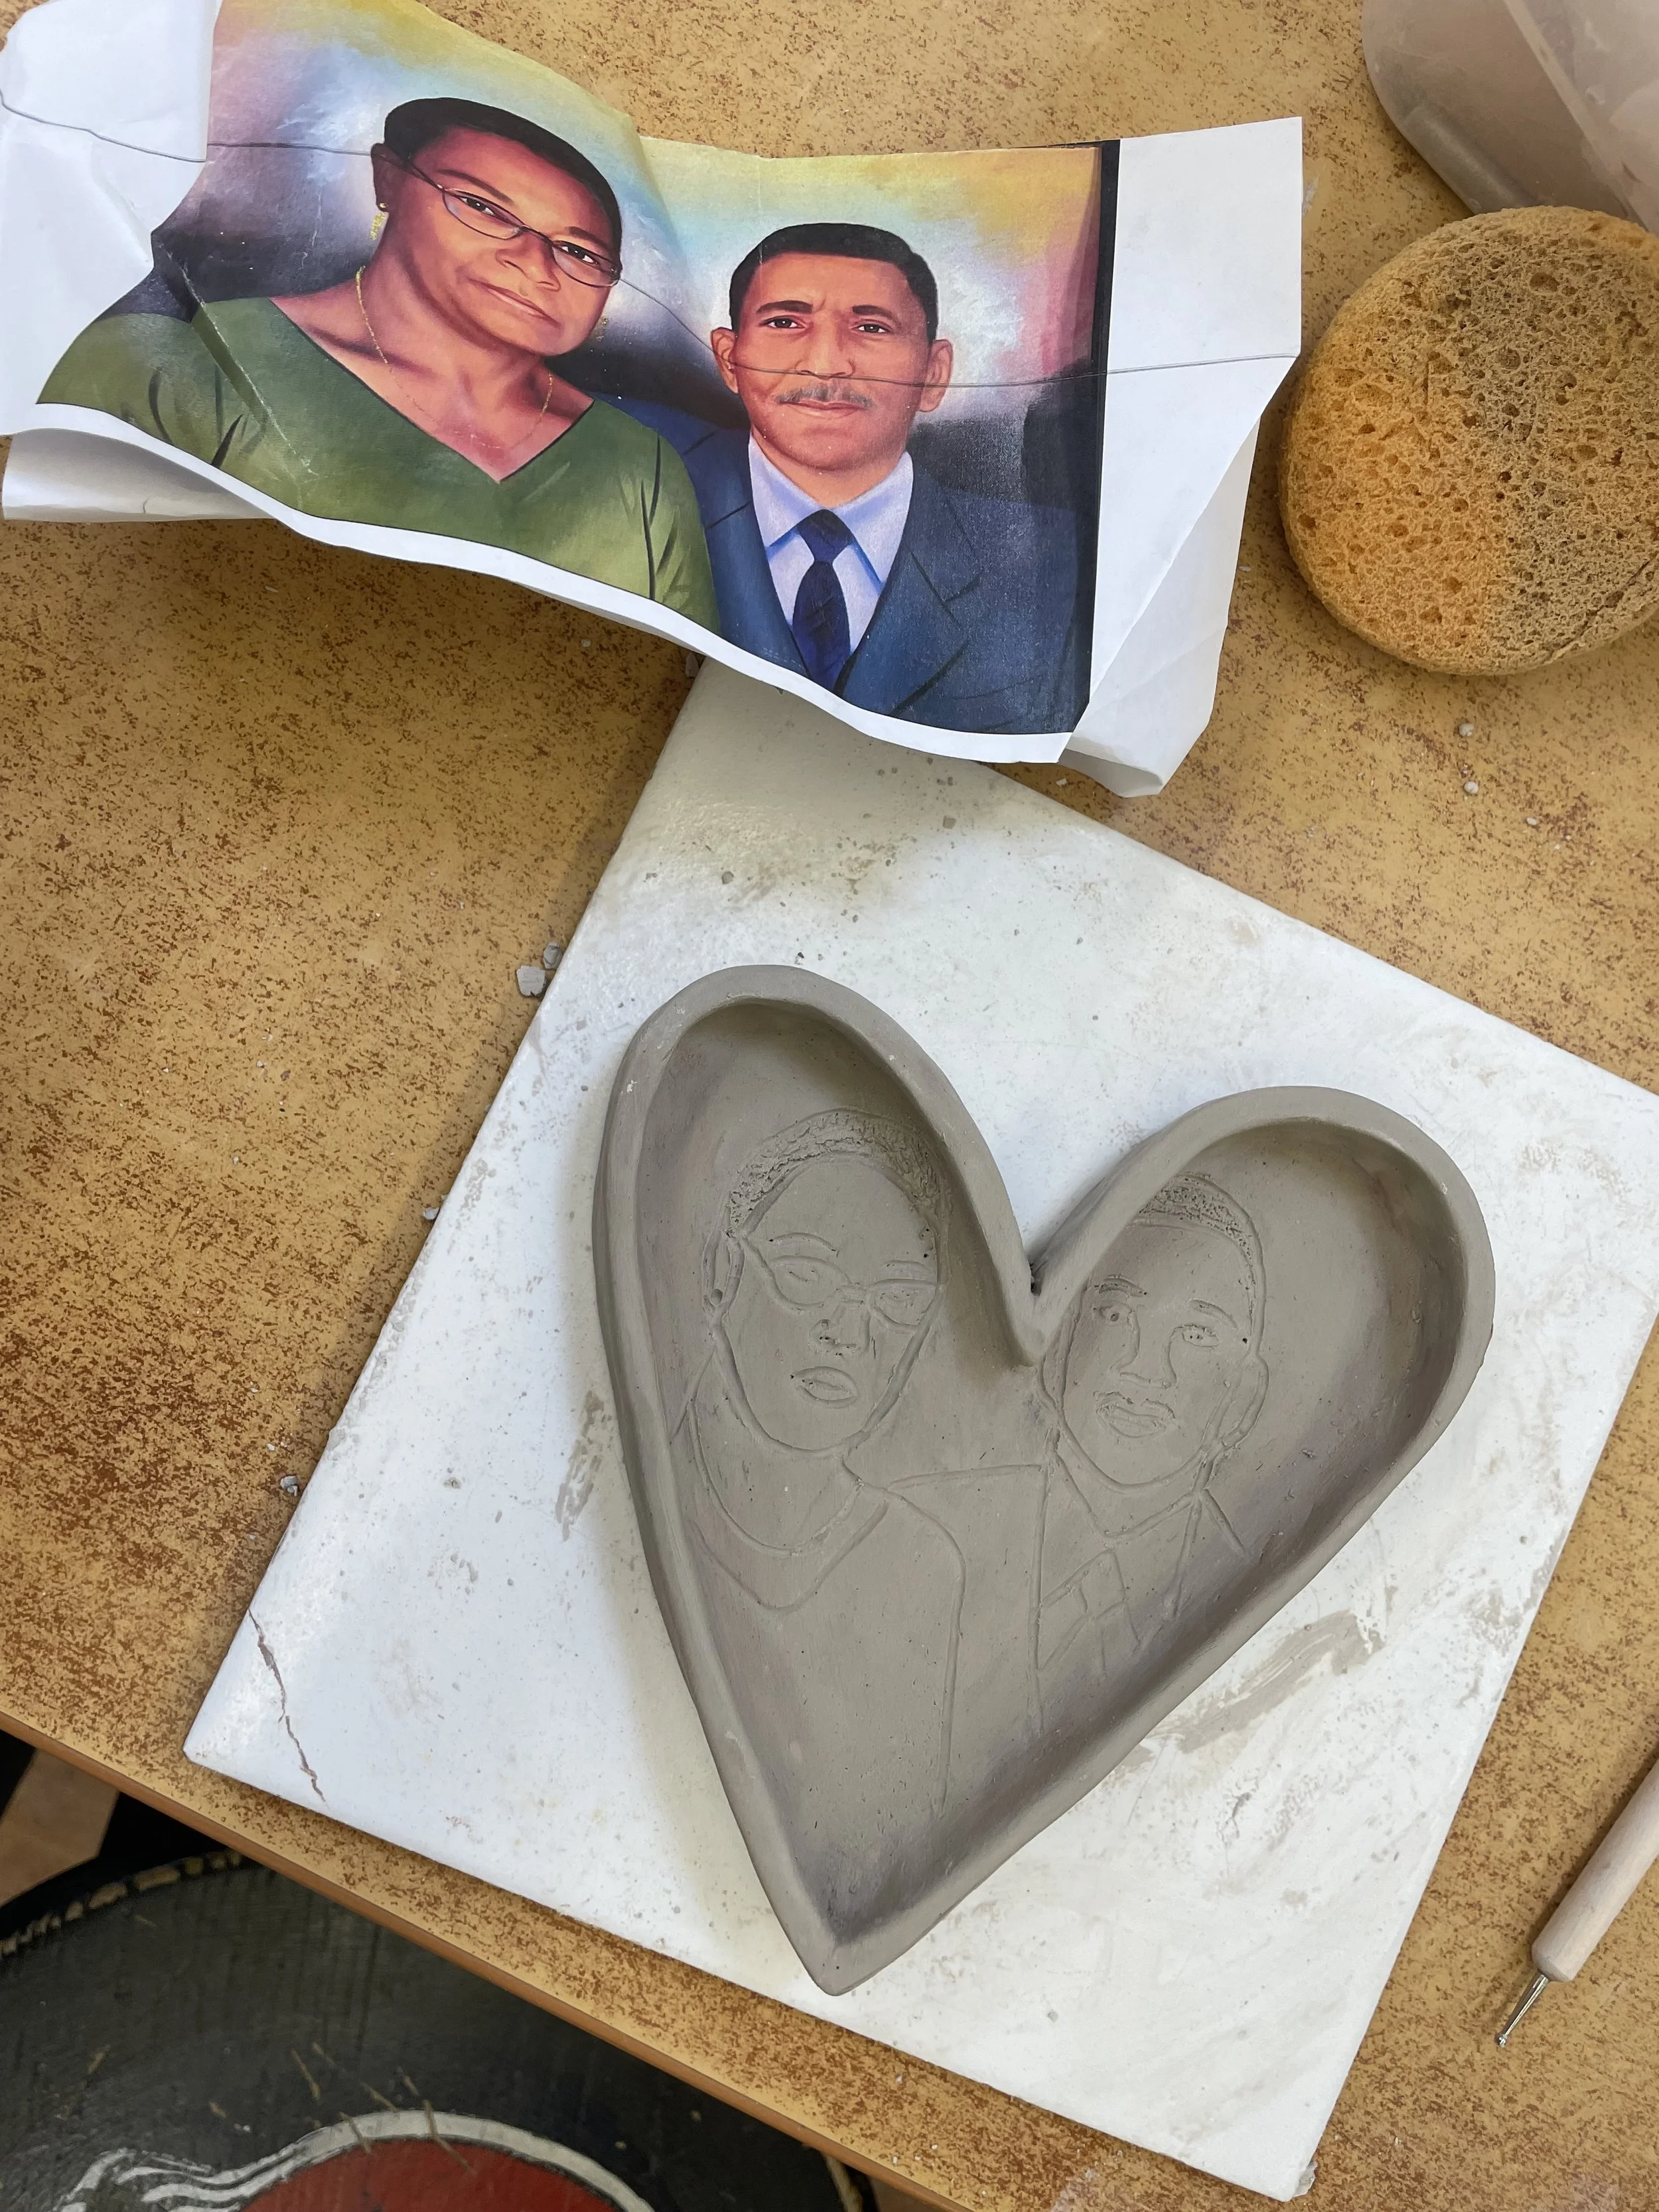
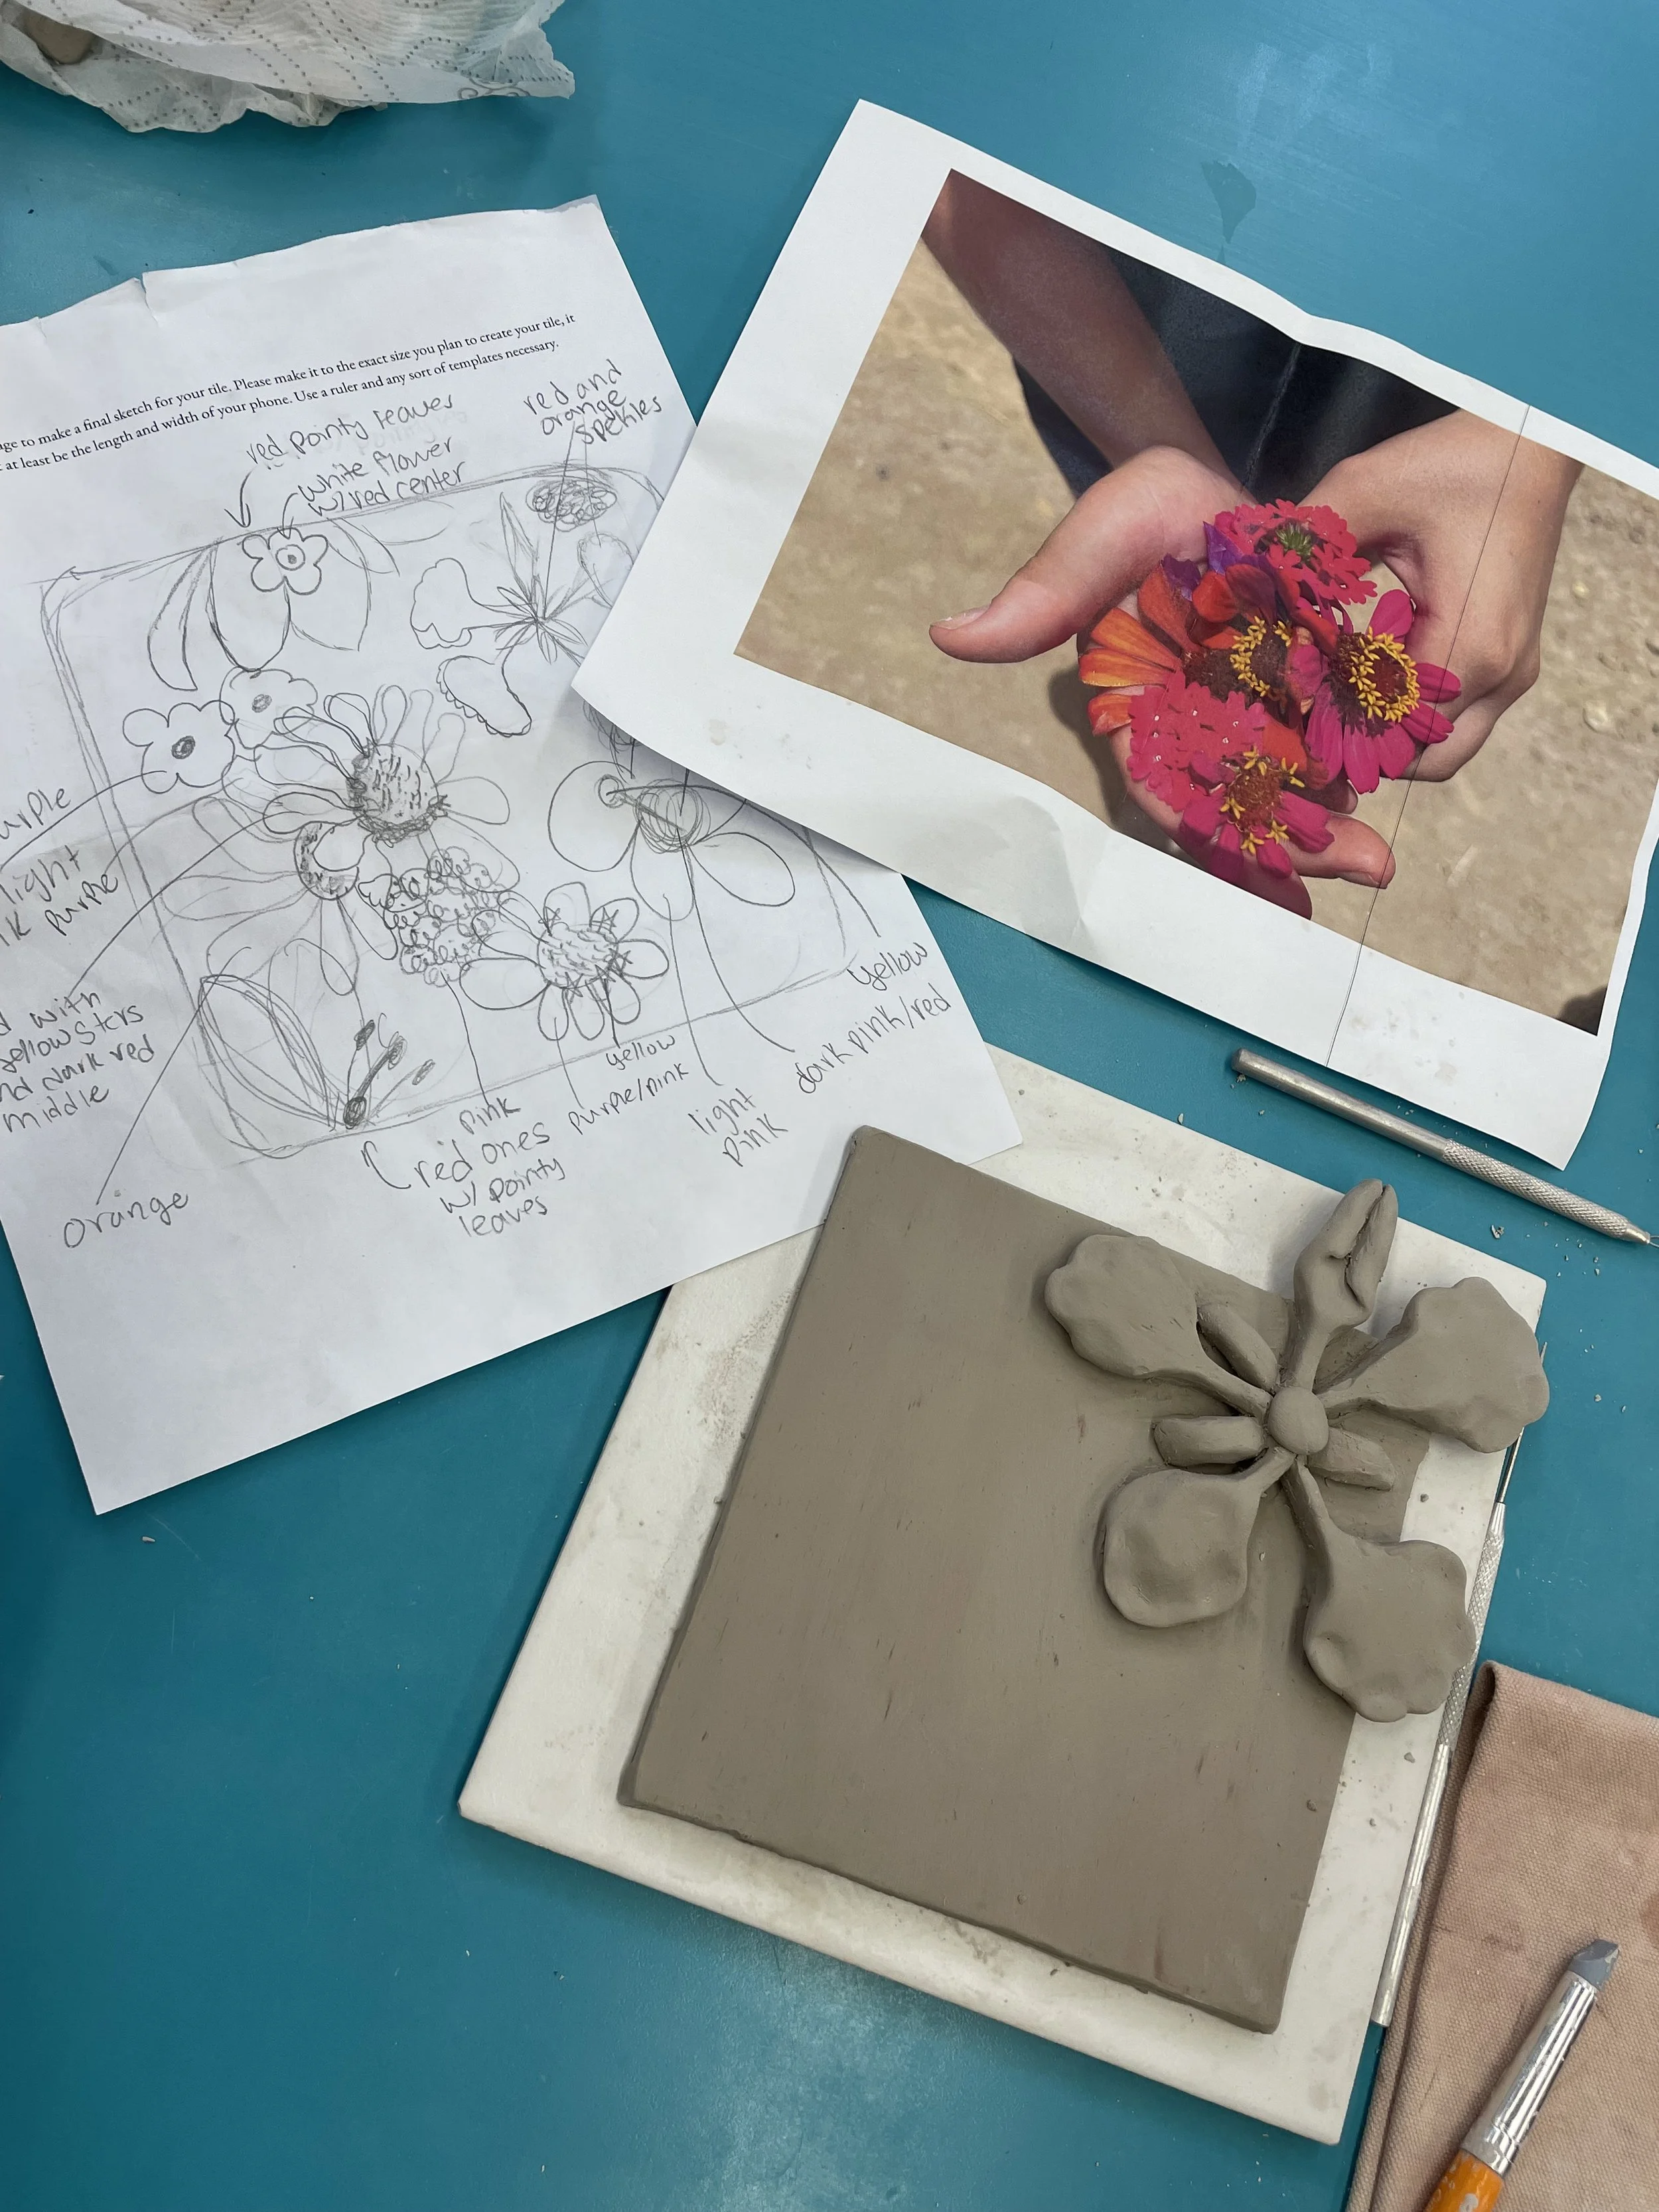
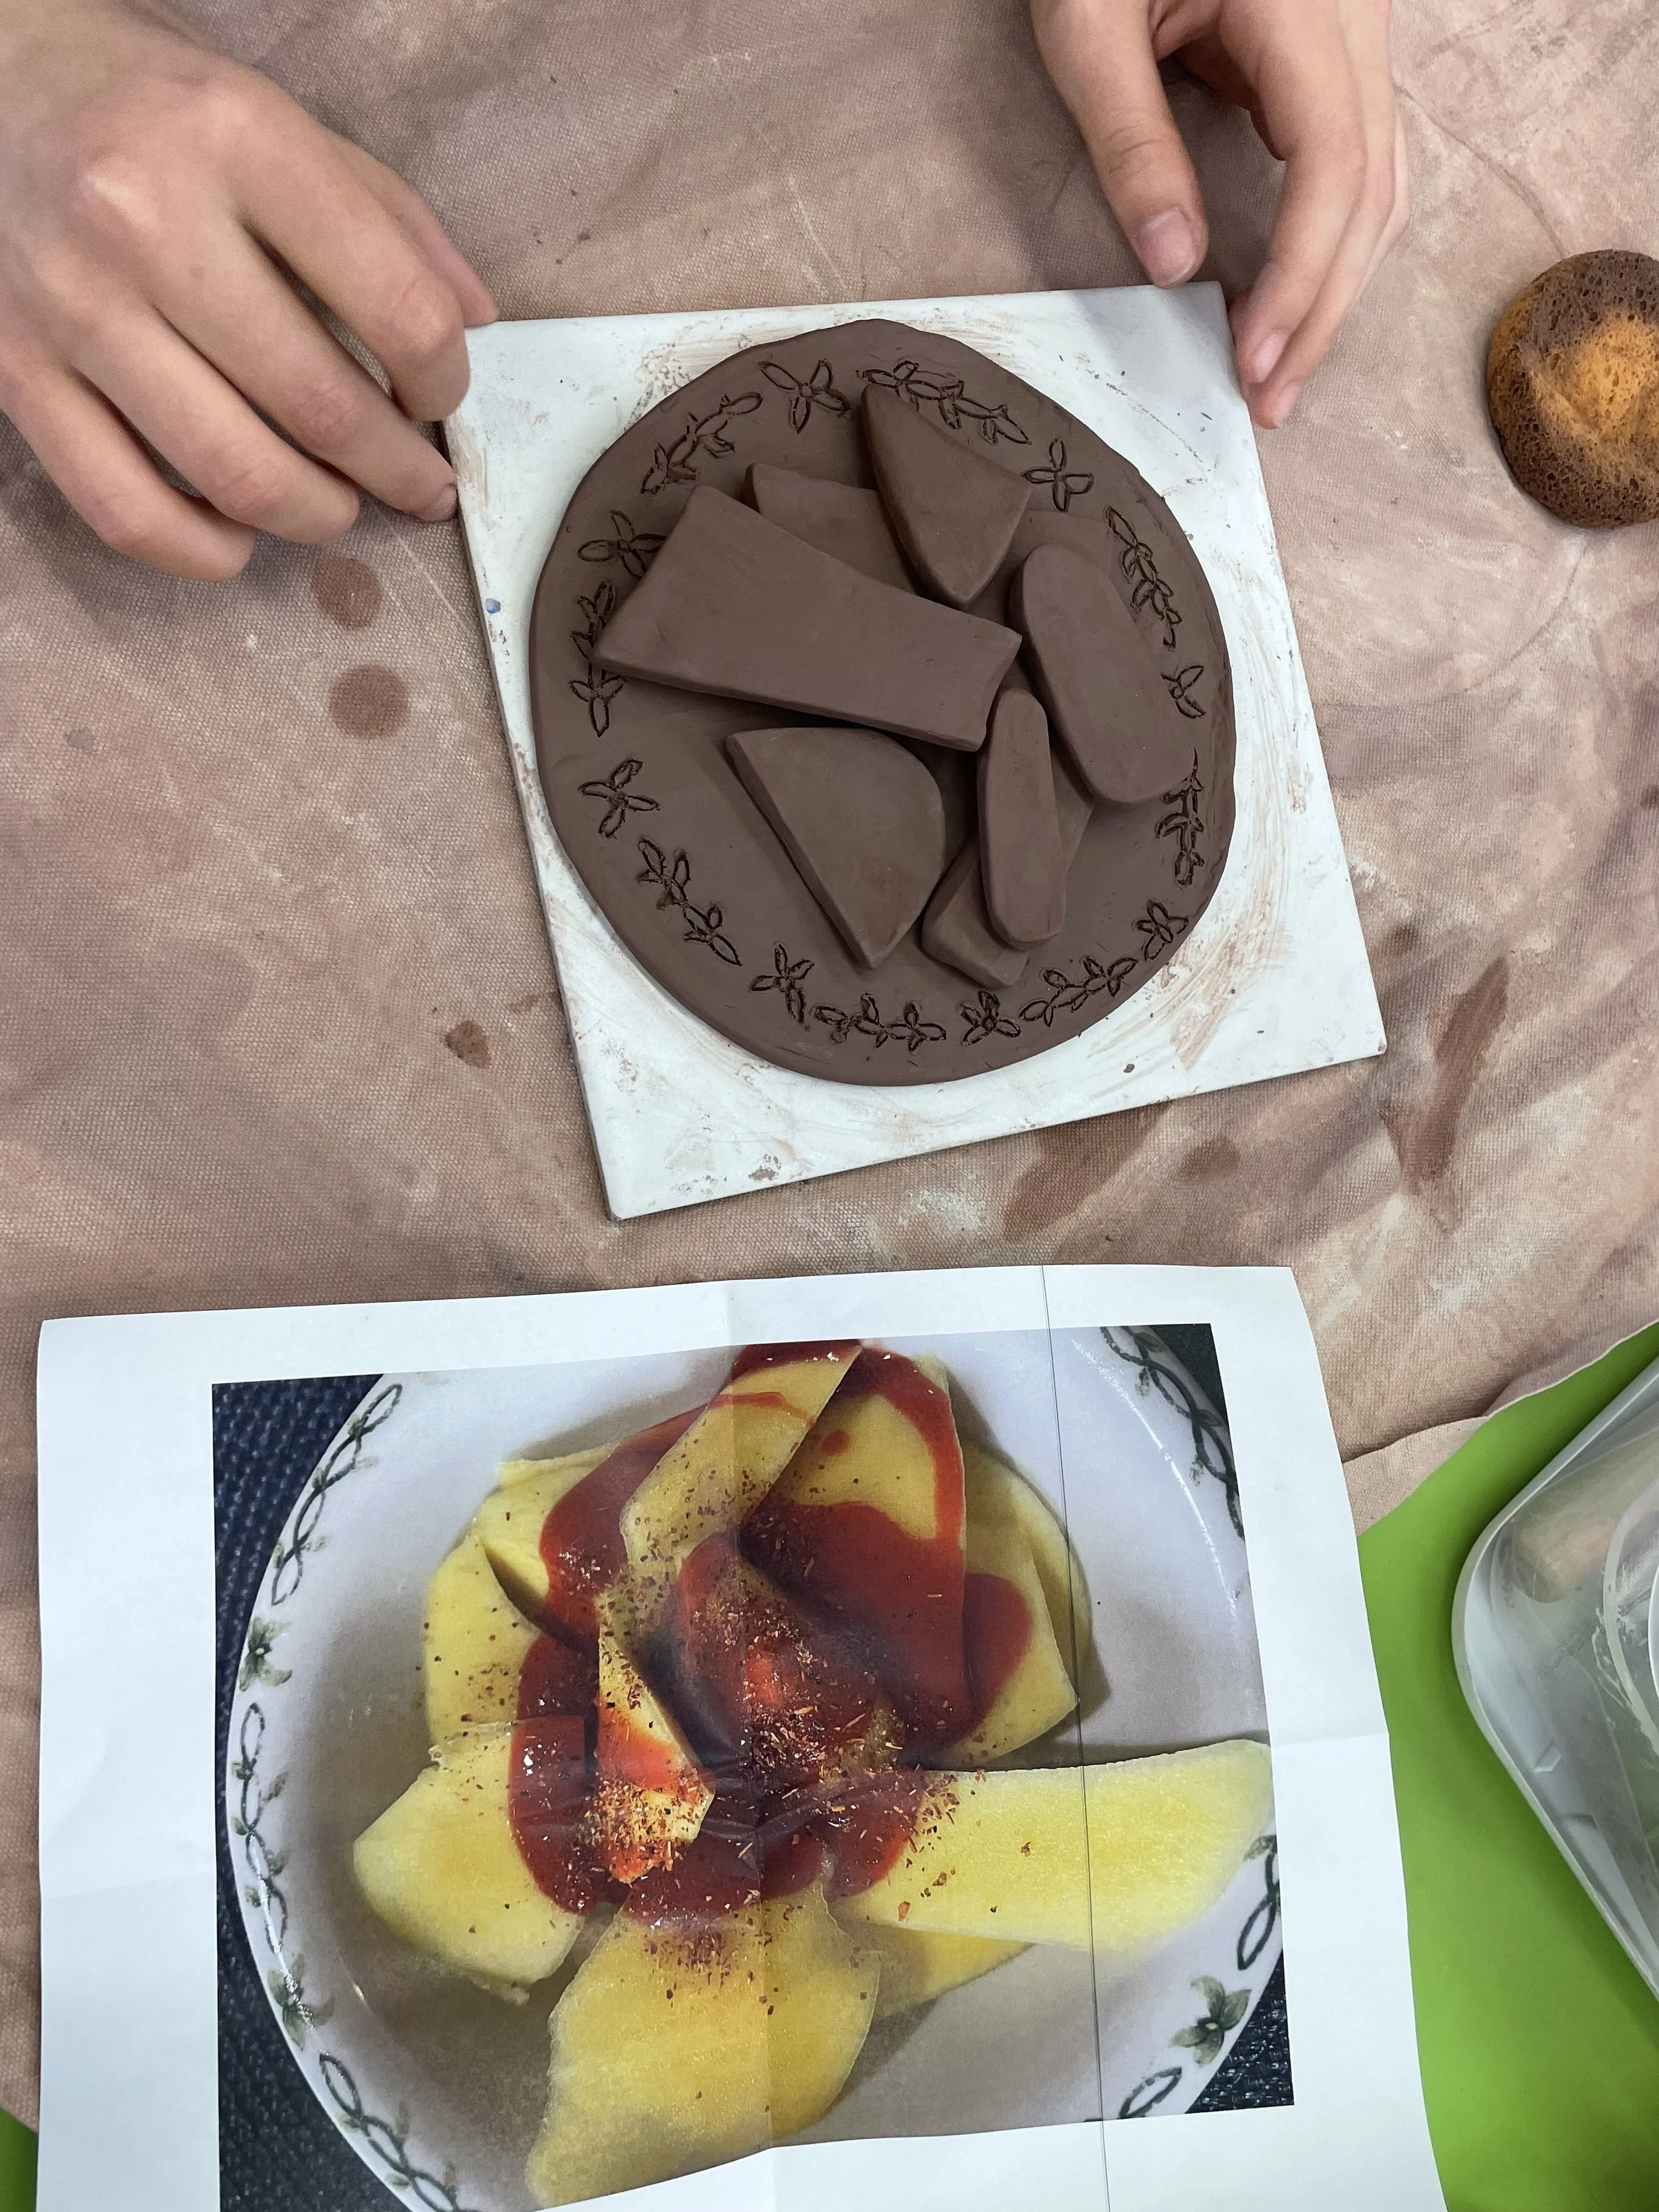
STUDENT EXAMPLES
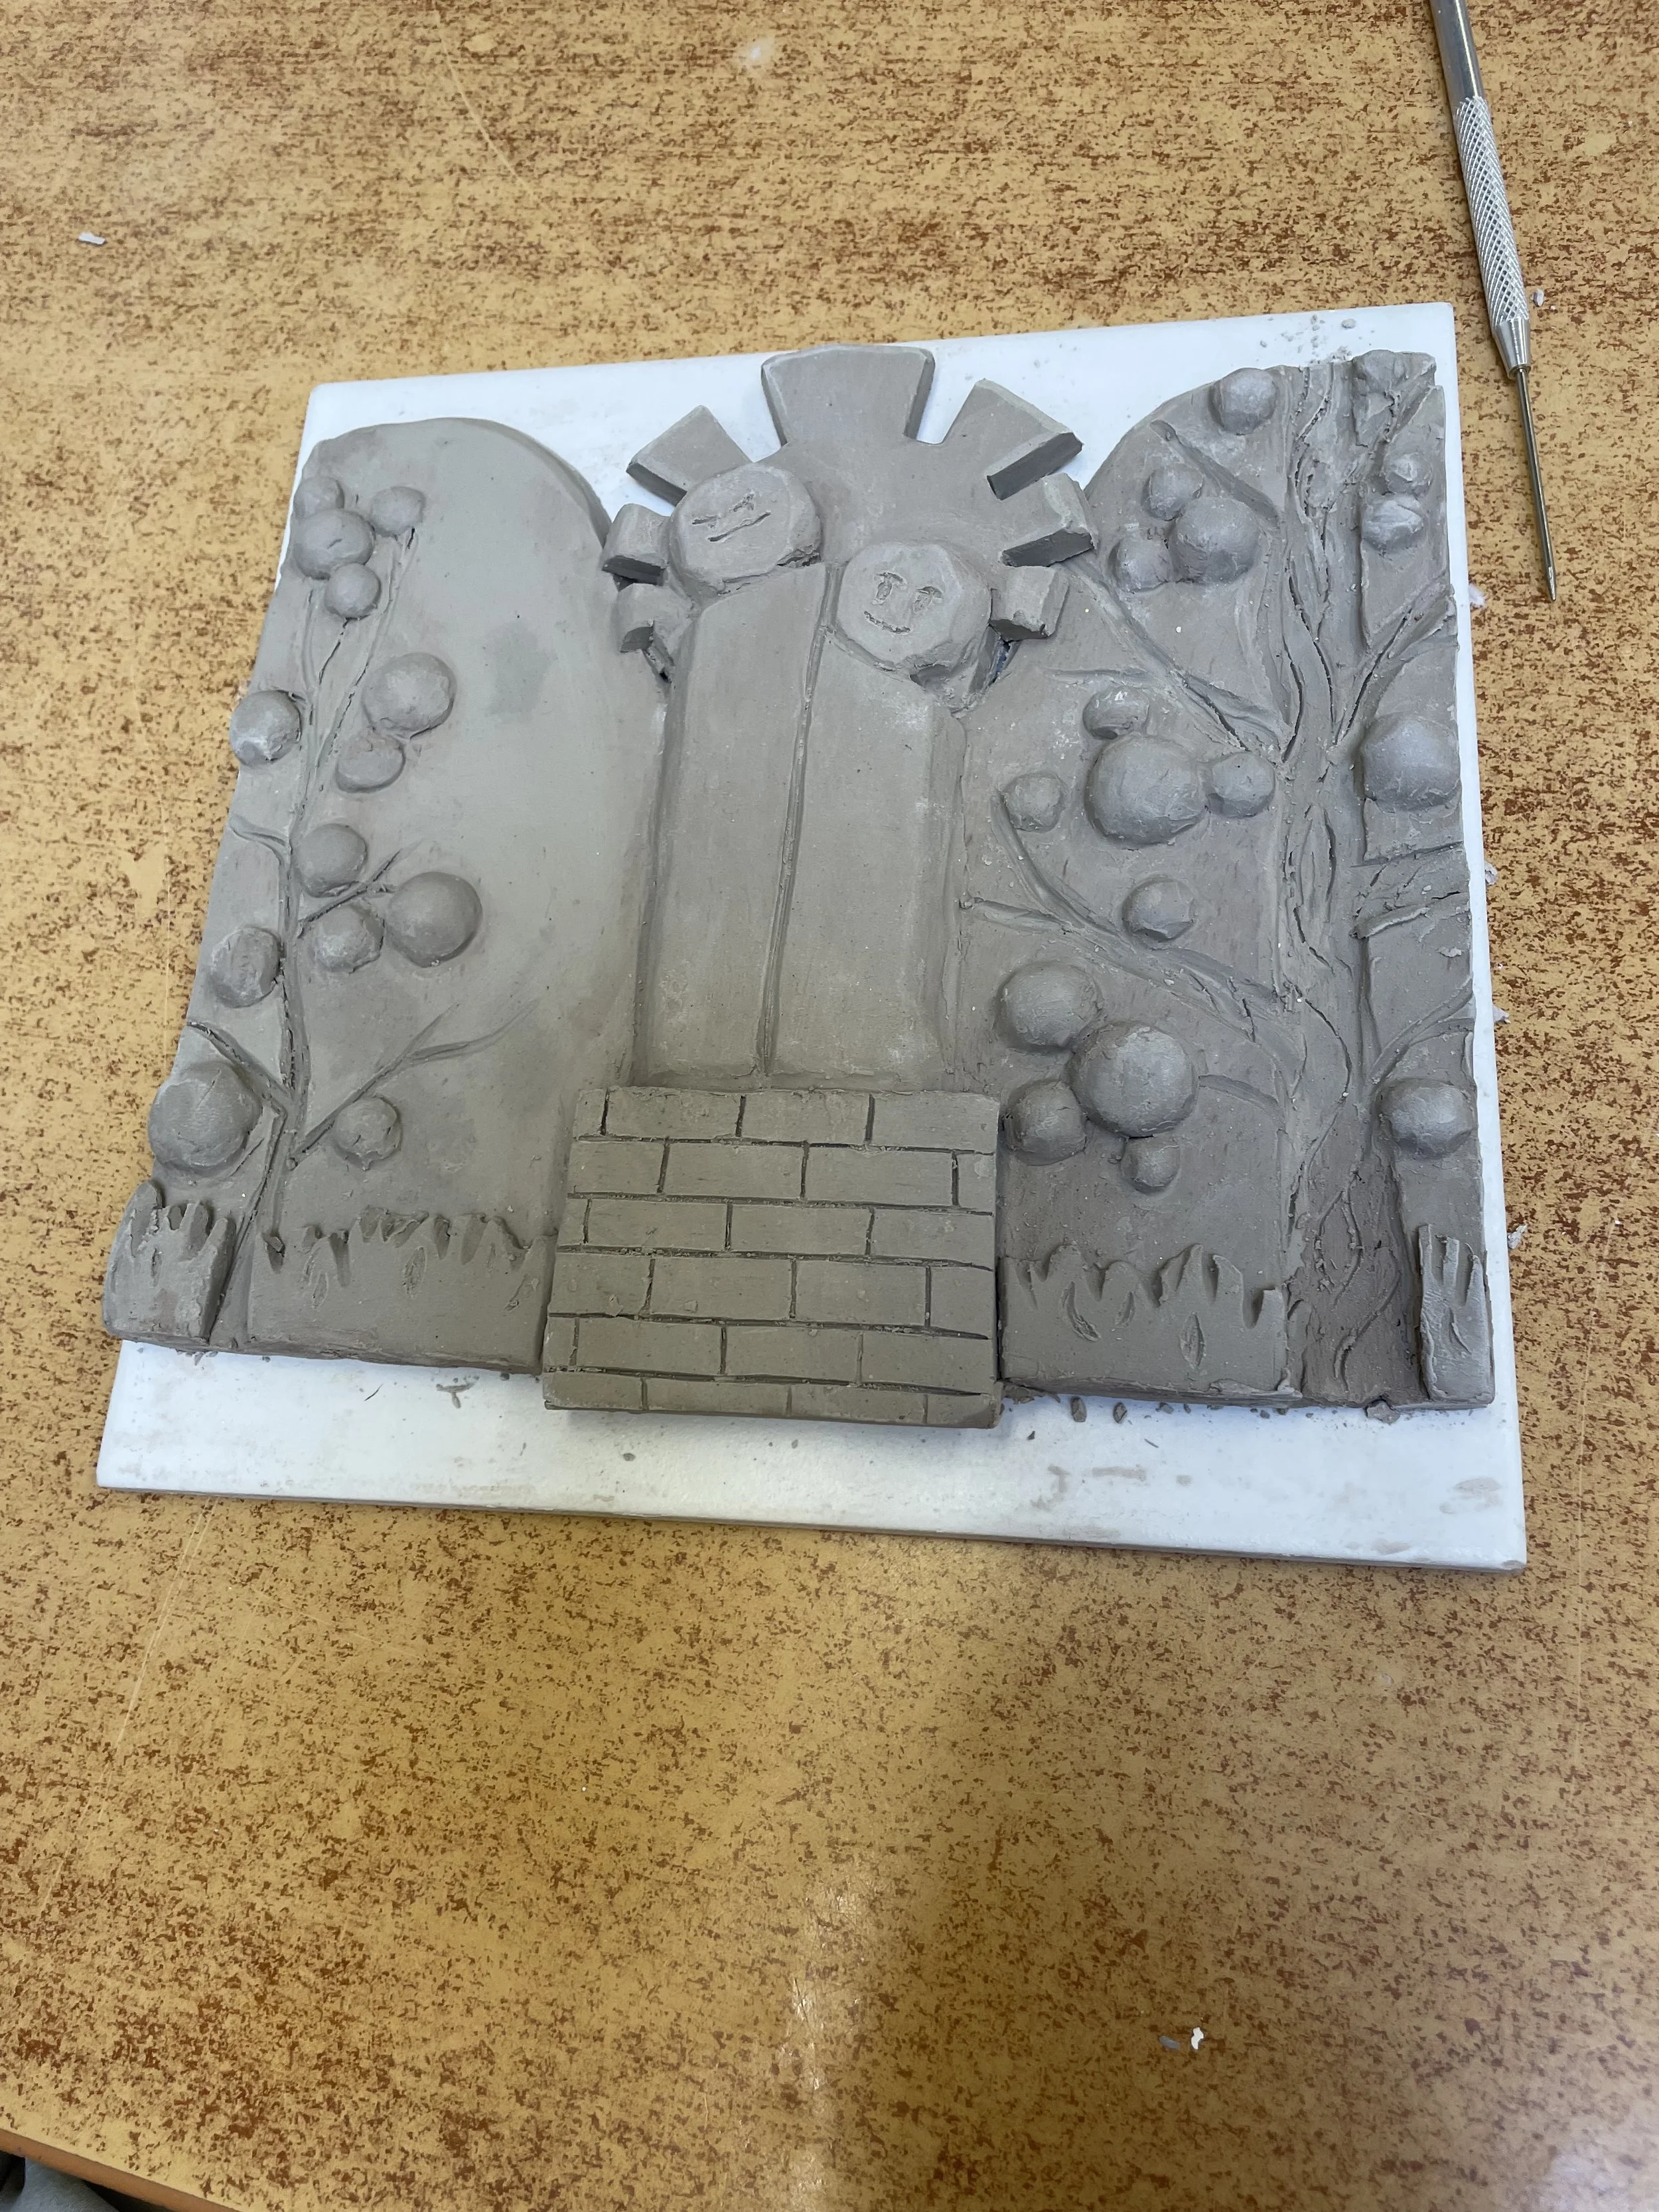
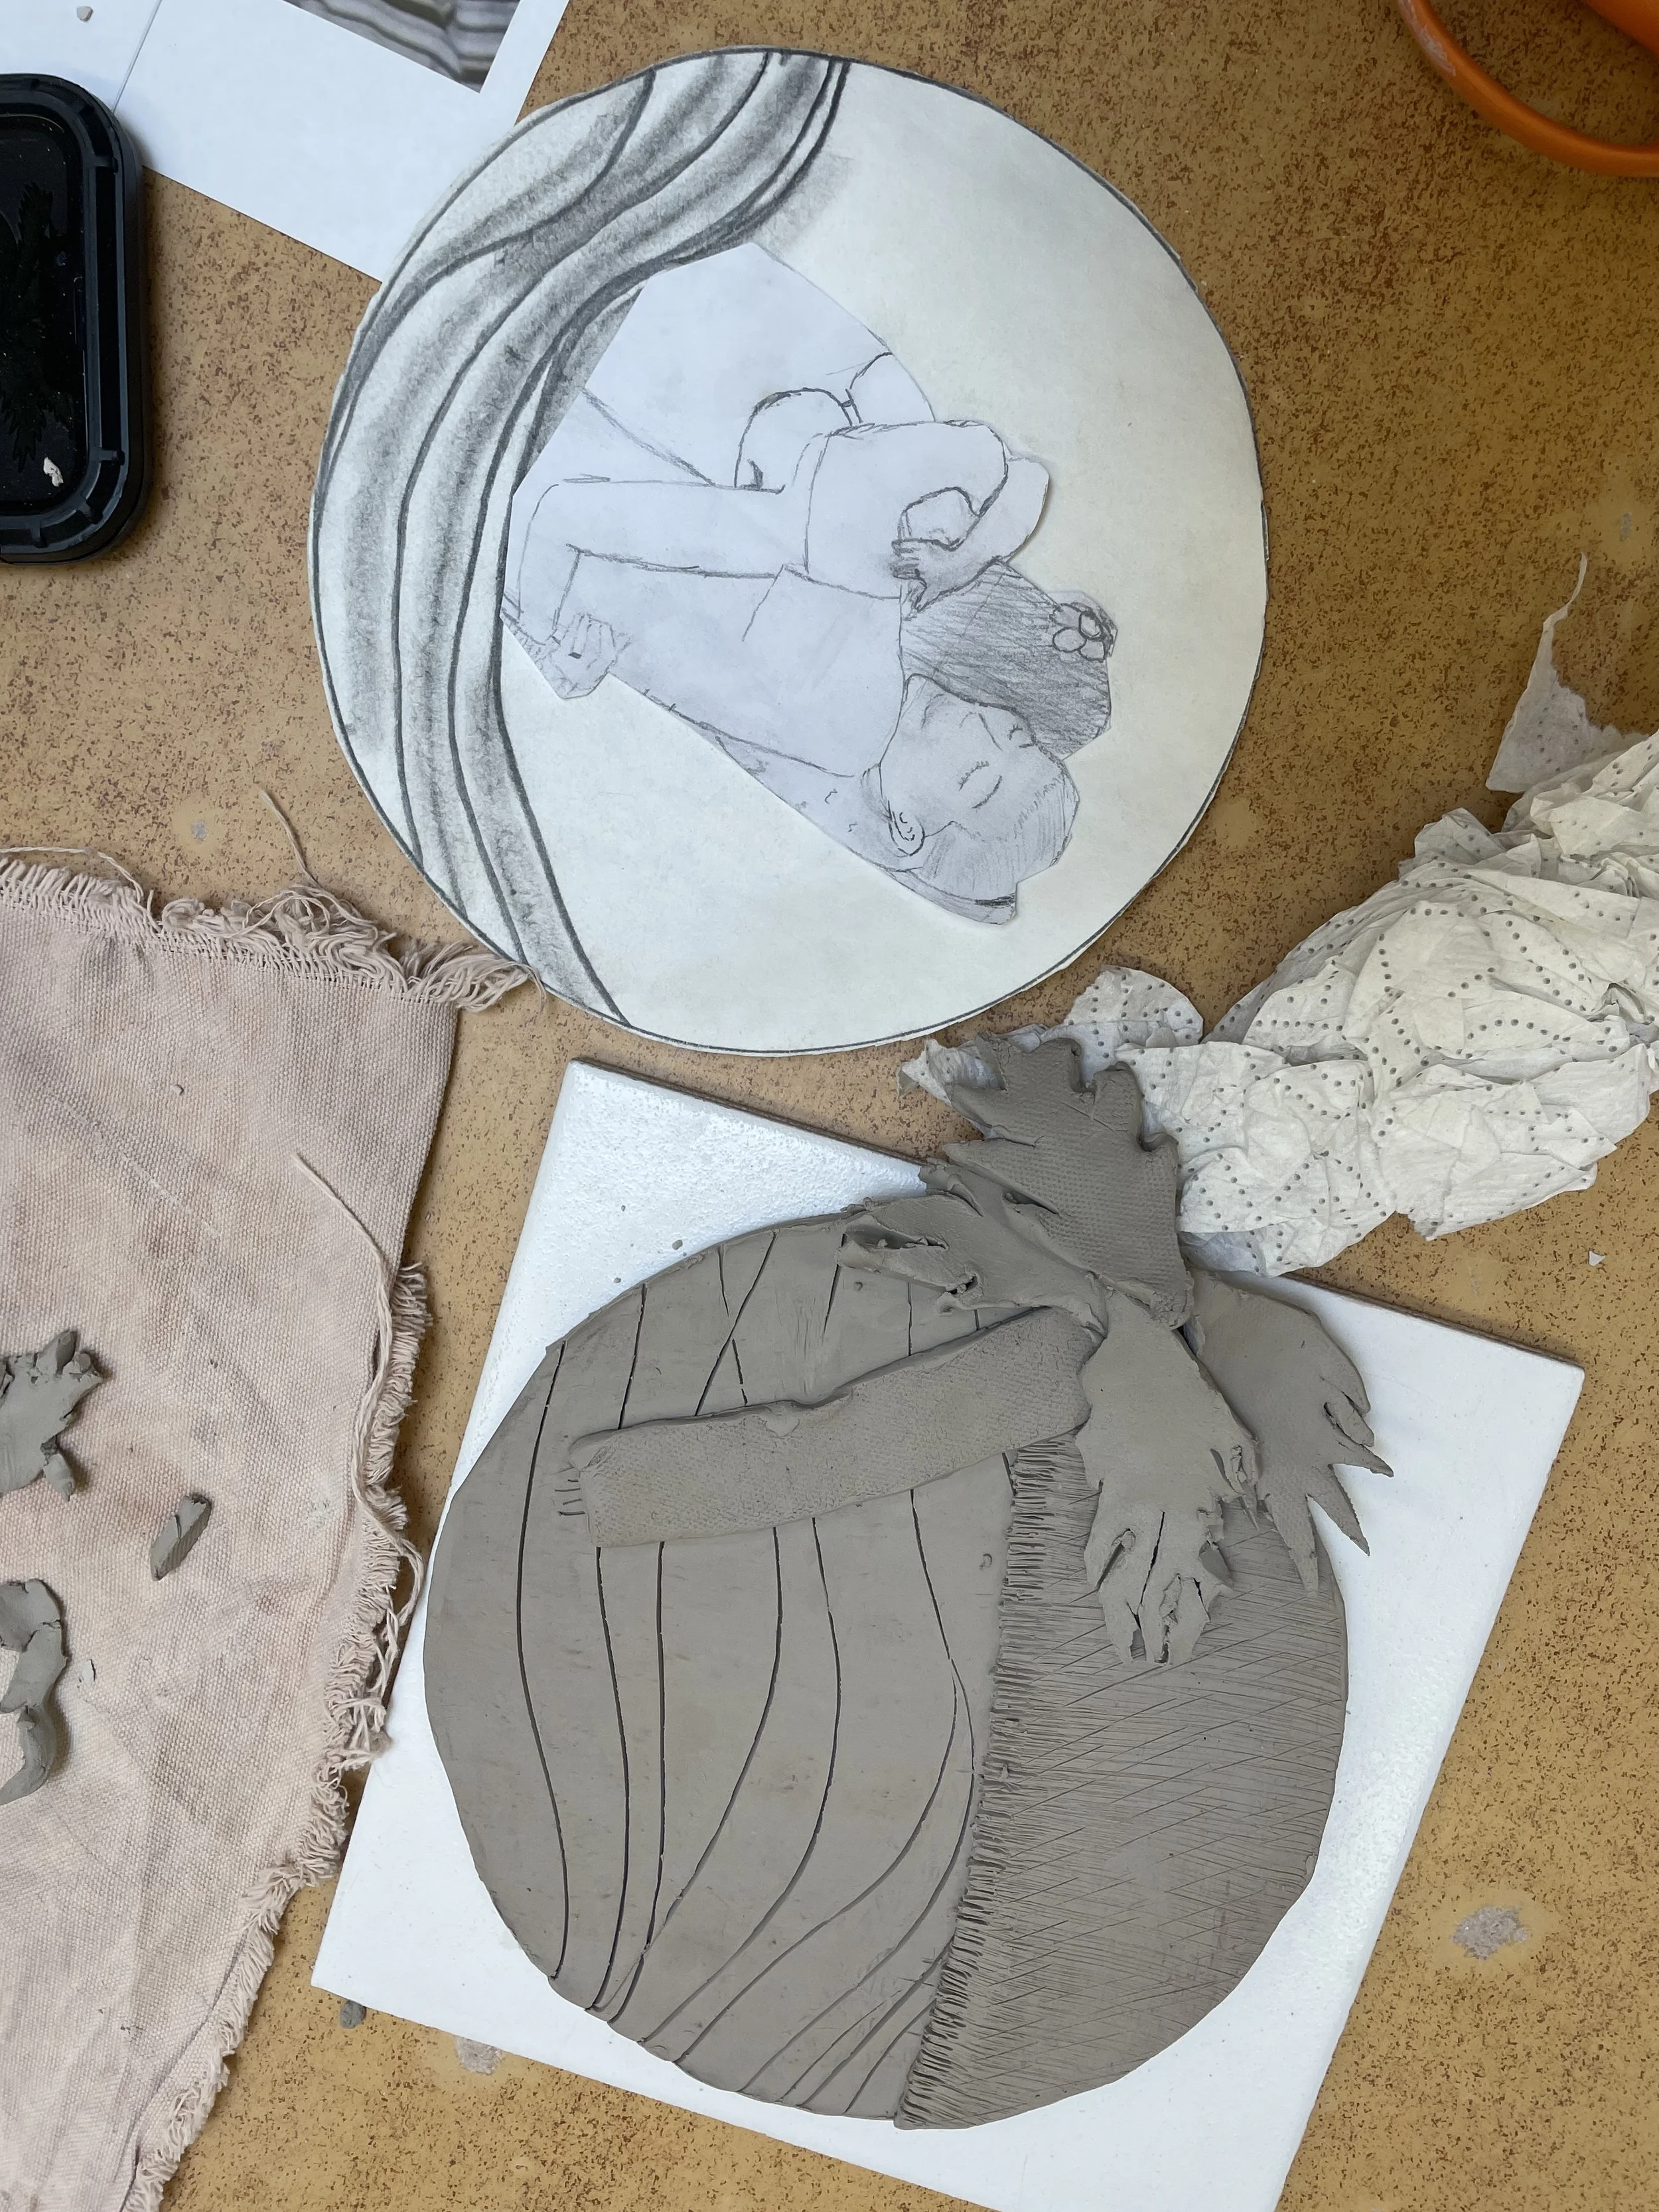

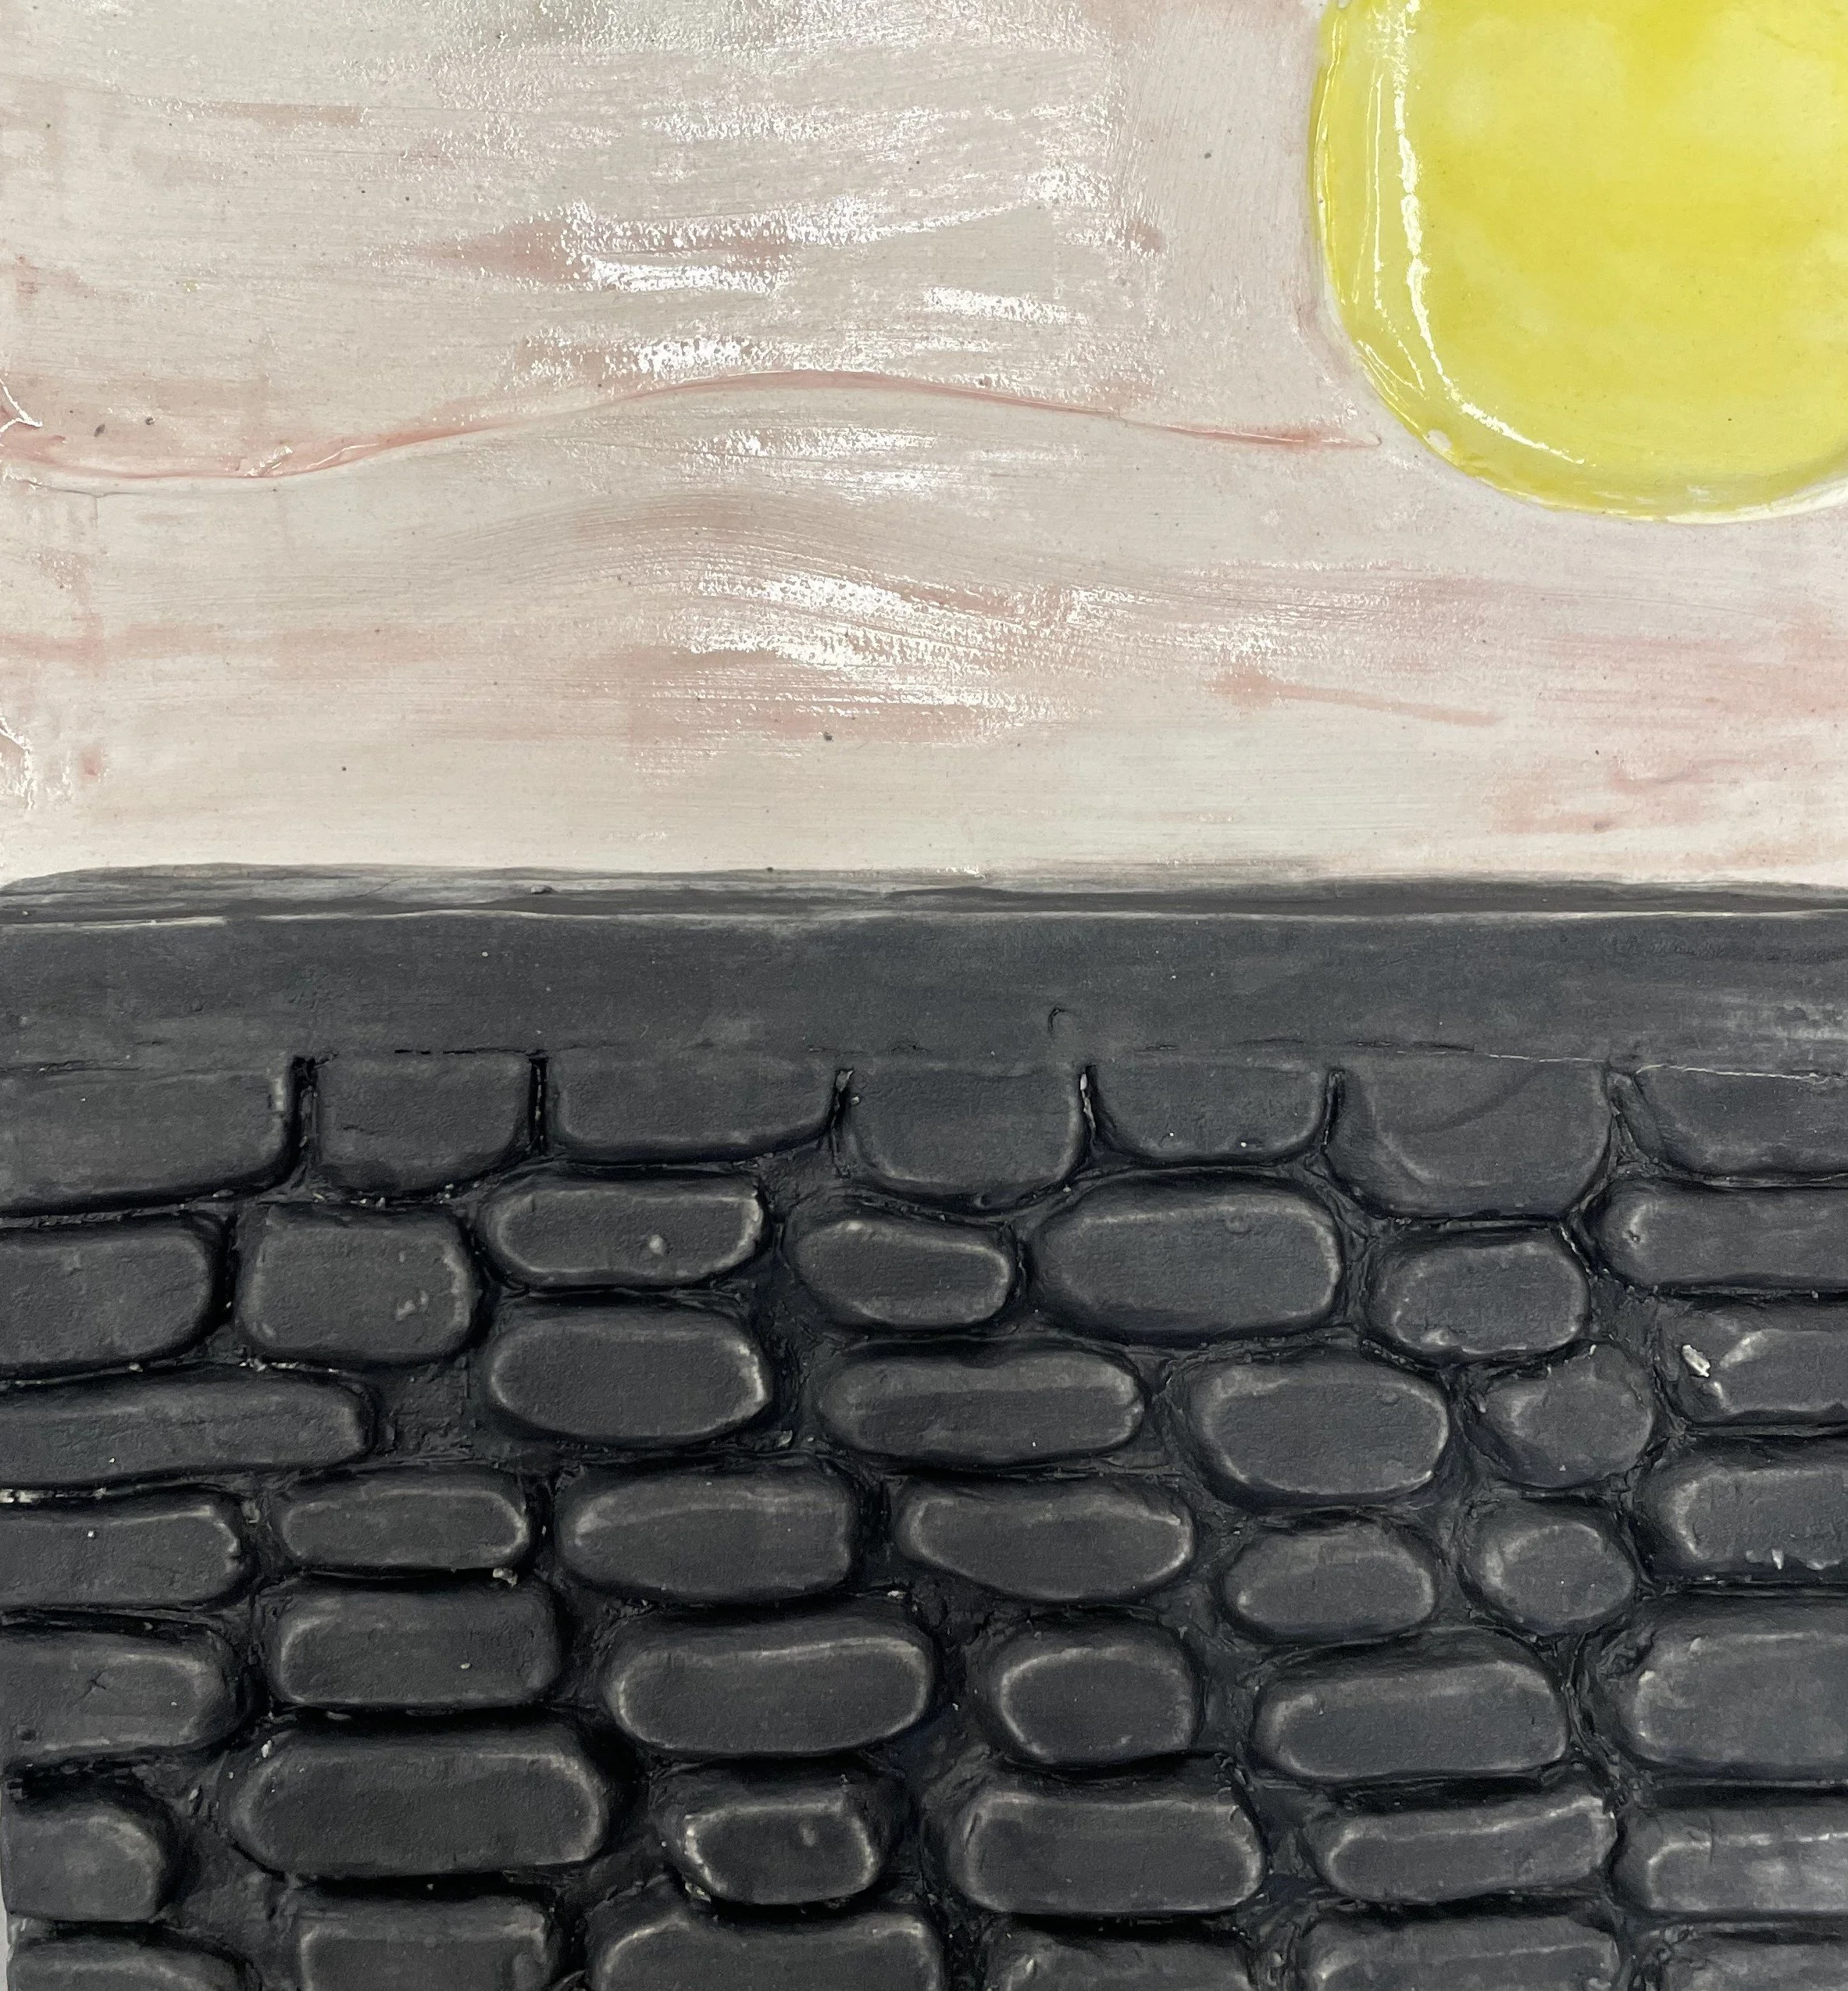
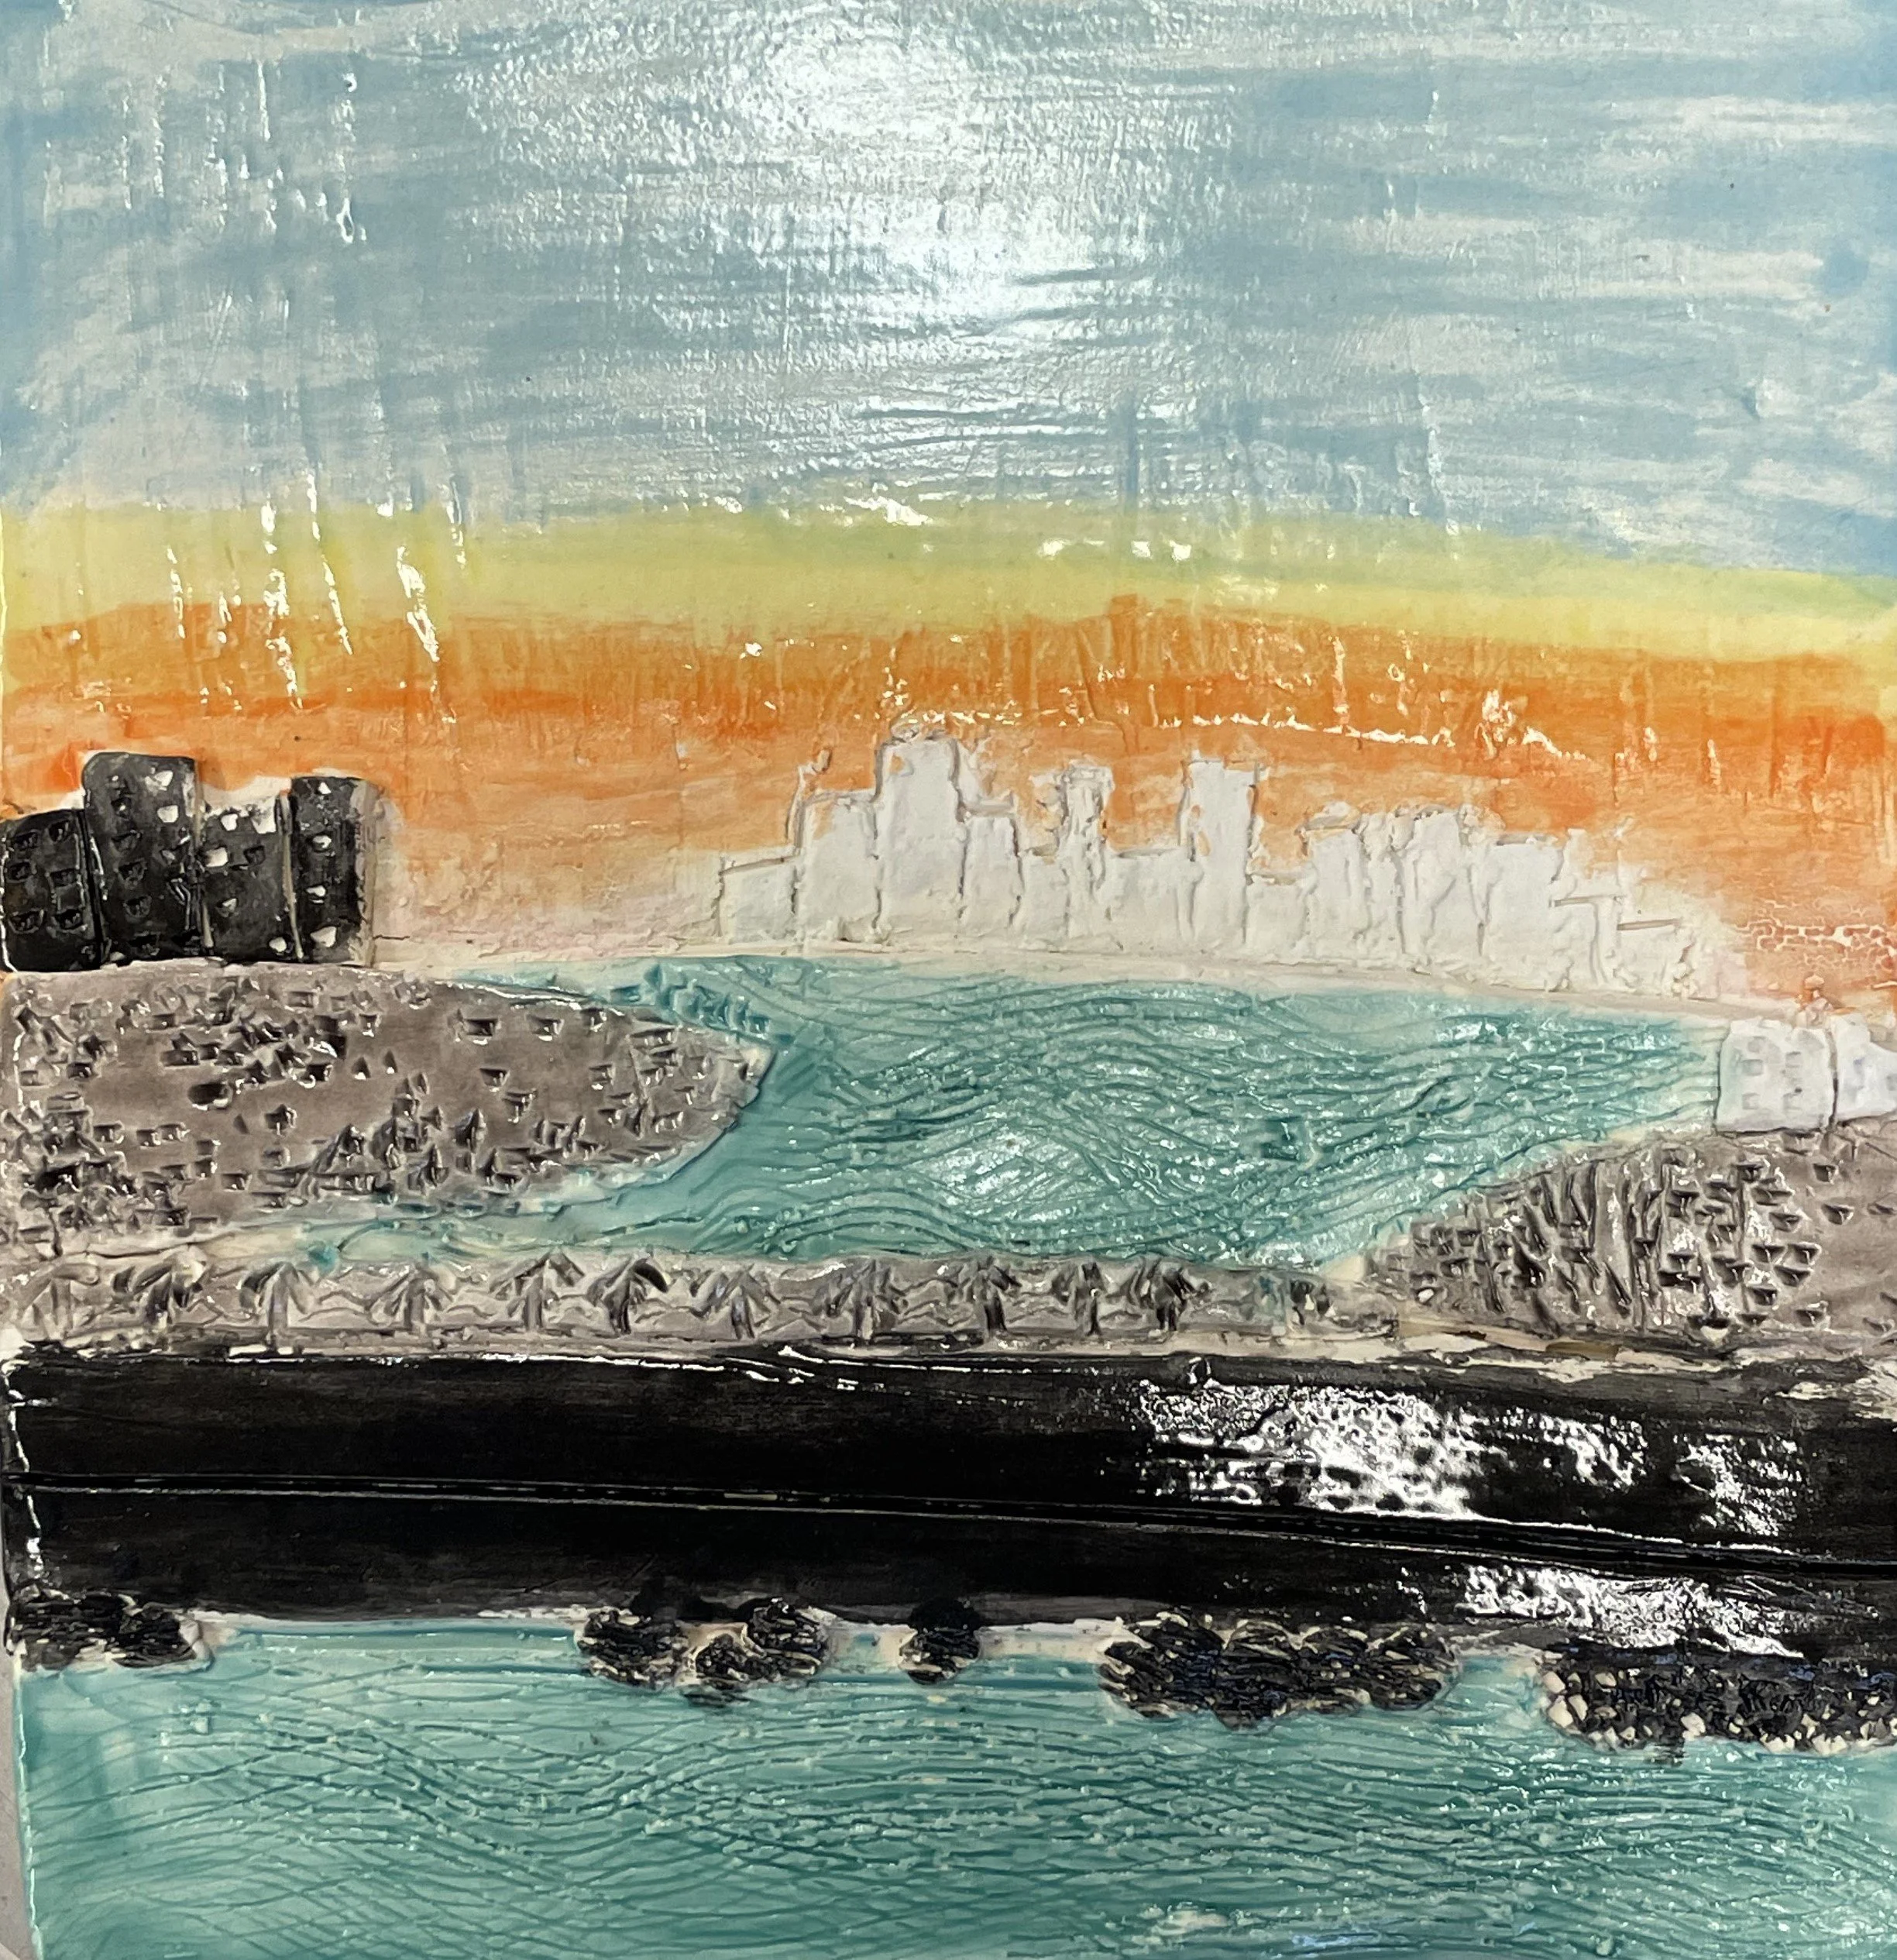
TEACHER EXAMPLE